
S3 Ingestion with Qdrant
| Time: 30 min | Level: Beginner |
|---|
Much of the data organizations hold is unstructured: reviews, documents, and images with no predefined schema. A vector database makes that data searchable by meaning, but first you need a pipeline that moves it from where it lives into Qdrant storage .
This tutorial builds that pipeline in Python. It reads product reviews and product images from an S3 bucket, turns both into embeddings with FastEmbed, and stores them in a Qdrant collection where you can search them by meaning.
The tutorial uses AWS S3, but it does not require it. Any service that speaks the S3 API works the same way, including self-hosted, open-source options such as MinIO and RustFS. You only need an endpoint URL and credentials.
Architecture
Each product has its own folder in the bucket, holding a text review and an image. A Python script lists the folders with boto3, downloads each review and image, and hands them to qdrant-client. The client embeds the text and the image locally with FastEmbed and upserts one point per product, with both vectors and the original review as payload.
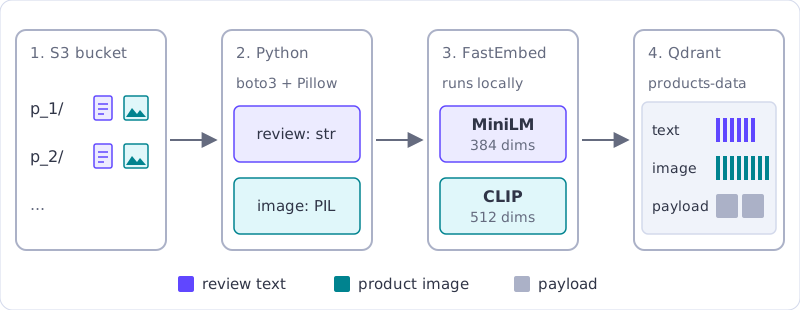
The pieces are:
- S3 bucket: the source of truth for the raw files, on AWS or on any S3-compatible service. Nothing here depends on a specific framework: any code that can read bytes from S3 can feed the pipeline.
- Python script: lists the folders, downloads the files, and decodes them. There is no orchestration layer, so each step is a plain function you can test and change.
- FastEmbed: runs embedding models on your machine through
qdrant-client. No embedding API key is needed. - Qdrant: stores the vectors and their payloads for similarity search.
Prerequisites
| Requirement | Details |
|---|---|
| S3 storage | An AWS account with access to S3 is recommended. It is not required: any S3-compatible service, such as MinIO or RustFS, works if you have its endpoint URL and an access key pair that can read and write the bucket. |
| S3 bucket | An empty bucket named product-dataset. On AWS, bucket names are globally unique, so pick a different name and update BUCKET in the code if this one is taken. |
| Qdrant Cloud | A Qdrant Cloud free cluster, with its URL and API key. |
| Python | Python 3.10 or higher. |
Install the libraries:
pip install boto3 pillow python-dotenv "qdrant-client[fastembed]"
Store your credentials in a .env file next to your script, so they stay out of your code:
ACCESS_KEY=""
SECRET_ACCESS_KEY=""
S3_ENDPOINT=""
QDRANT_URL=""
QDRANT_KEY=""
Leave S3_ENDPOINT empty for AWS S3. For an S3-compatible service, set it to the service URL, for example http://localhost:9000 for a local instance. ACCESS_KEY and SECRET_ACCESS_KEY are the credentials of your service, whichever it is.
Step 1: Connect to S3 and Qdrant
Create one client for each service. load_dotenv() copies the values from .env into environment variables. The endpoint_url argument is what points boto3 at an S3-compatible service instead of AWS:
import io
import os

import boto3
from dotenv import load_dotenv
from PIL import Image
from qdrant_client import QdrantClient, models

load_dotenv()  # reads the .env file into environment variables

BUCKET: str = "product-dataset"
COLLECTION: str = "products-data"

# Leave S3_ENDPOINT empty for AWS S3. For MinIO, RustFS, or another
# S3-compatible service, set it to the service URL, e.g. http://localhost:9000
s3 = boto3.client(
    "s3",
    aws_access_key_id=os.environ["ACCESS_KEY"],
    aws_secret_access_key=os.environ["SECRET_ACCESS_KEY"],
    endpoint_url=os.environ.get("S3_ENDPOINT") or None,
)

# Replace url with your own cluster URL from https://cloud.qdrant.io
client = QdrantClient(
    url=os.environ["QDRANT_URL"],
    api_key=os.environ["QDRANT_KEY"],
)
If your service only supports path-style addressing (http://host/bucket/key instead of http://bucket.host/key), also pass config=botocore.config.Config(s3={"addressing_style": "path"}) to boto3.client.
Step 2: Add Sample Data to the Bucket
The pipeline expects one folder per product, each with a review.txt and a product.png:
product-dataset/
├── p_1/
│   ├── review.txt
│   └── product.png
├── p_2/
│   ├── review.txt
│   └── product.png
└── ...
If you already have product data, upload it in this layout. Otherwise, this script creates five products. The reviews are real sentences, but the images are plain colored squares that stand in for product photos, so swap them for real pictures if you want meaningful image search later.
REVIEWS: dict[str, str] = {
    "p_1": (
        "The new phone has a much improved design: thinner bezels, a flat "
        "frame, and a screen that feels bigger without a bigger body."
    ),
    "p_2": (
        "These wireless earbuds hold a steady connection and the noise "
        "cancelling is excellent on a noisy commute, though the case is bulky."
    ),
    "p_3": (
        "The laptop is fast and quiet, but the battery only lasts about five "
        "hours of real work, which is disappointing for the price."
    ),
    "p_4": (
        "A smartwatch with a bright display and accurate sleep tracking. "
        "The strap is comfortable enough to wear overnight."
    ),
    "p_5": (
        "This mechanical keyboard has a satisfying typing feel and a solid "
        "build, but the keys are louder than I expected."
    ),
}

def placeholder_png(shade: int) -> bytes:
    """Render a plain colored square. Replace it with a real product photo."""
    buffer = io.BytesIO()
    color = (40 * shade, 90, 160)
    Image.new("RGB", (224, 224), color=color).save(buffer, format="PNG")
    return buffer.getvalue()

for product_id, review in REVIEWS.items():
    s3.put_object(
        Bucket=BUCKET,
        Key=f"{product_id}/review.txt",
        Body=review.encode("utf-8"),
    )
    s3.put_object(
        Bucket=BUCKET,
        Key=f"{product_id}/product.png",
        Body=placeholder_png(int(product_id[-1])),
    )
Step 3: Read the Files from S3
Two small functions cover reading. list_products asks S3 for the top-level folders, using a paginator because a single list_objects_v2 call returns at most 1,000 keys. read_product downloads the review as text and the image as a PIL image:
def list_products(bucket: str) -> list[str]:
    """Return the top-level folder names, one per product (p_1, p_2, ...)."""
    paginator = s3.get_paginator("list_objects_v2")
    folders: list[str] = []
    for page in paginator.paginate(Bucket=bucket, Delimiter="/"):
        for item in page.get("CommonPrefixes", []):
            folders.append(item["Prefix"].rstrip("/"))
    return sorted(folders)

def read_product(bucket: str, product_id: str) -> tuple[str, Image.Image]:
    """Download the review text and the product image of one product folder."""
    review_obj = s3.get_object(Bucket=bucket, Key=f"{product_id}/review.txt")
    image_obj = s3.get_object(Bucket=bucket, Key=f"{product_id}/product.png")
    review: str = review_obj["Body"].read().decode("utf-8")
    image = Image.open(io.BytesIO(image_obj["Body"].read()))
    return review, image
This tutorial handles text and PNG files. To ingest PDFs, add a function that extracts their text, for example with pypdf, and feed the result through the same pipeline.
Step 4: Create the Collection
Each product has two representations, so the collection holds two named vectors:
| Vector | Model | Dimensions |
|---|---|---|
text_embedding | sentence-transformers/all-MiniLM-L6-v2 | 384 |
image_embedding | Qdrant/clip-ViT-B-32-vision, the image encoder of CLIP | 512 |
The collection’s vector sizes must match the models’ output dimensions, and both vectors use cosine distance:
TEXT_MODEL: str = "sentence-transformers/all-MiniLM-L6-v2"
IMAGE_MODEL: str = "Qdrant/clip-ViT-B-32-vision"

if not client.collection_exists(COLLECTION):
    client.create_collection(
        COLLECTION,
        vectors_config={
            "text_embedding": models.VectorParams(
                size=384,  # output dimension of all-MiniLM-L6-v2
                distance=models.Distance.COSINE,
            ),
            "image_embedding": models.VectorParams(
                size=512,  # output dimension of CLIP ViT-B/32
                distance=models.Distance.COSINE,
            ),
        },
    )
Step 5: Embed and Upload
Loop over the products, build one point for each, and upsert them all in one call:
points: list[models.PointStruct] = []
for idx, product_id in enumerate(list_products(BUCKET)):
    review, image = read_product(BUCKET, product_id)
    points.append(
        models.PointStruct(
            id=idx,
            vector={
                "text_embedding": models.Document(text=review, model=TEXT_MODEL),
                "image_embedding": models.Image(image=image, model=IMAGE_MODEL),
            },
            payload={
                "product_id": product_id,
                "review": review,
                "image_source": f"s3://{BUCKET}/{product_id}/product.png",
            },
        )
    )

client.upsert(collection_name=COLLECTION, points=points)
Each point has three parts:
id: a unique identifier. Upserting a point with an existing ID replaces it, so rerunning the script does not create duplicates.vector: amodels.Documentfor text and amodels.Imagefor the image. Because nocloud_inferenceoption is set,qdrant-clientdownloads each model on first use and embeds the input on your machine. See FastEmbed for the available models.payload: metadata stored with the point. Here it holds the product folder, the review text, and the S3 location of the image, so a search result can point back to the source file.
For larger datasets, build and upload the points in batches instead of holding them all in memory, and consider client.upload_points, which batches and retries for you.
Step 6: Verify the Ingestion
Check that every product arrived:
print(client.count(COLLECTION, exact=True).count)
The output is 5 if you used the sample data.
You can also browse the collection in the Qdrant Web UI. For a Qdrant Cloud cluster, open your cluster URL with :6333/dashboard appended and enter your API key. Collections lists the points with their payloads, and Console runs REST requests against the collection.
Step 7: Search
Search the review text with a natural-language query. Wrap the query in a models.Document with the same model used for ingestion, and choose the vector to search with using:
results = client.query_points(
    collection_name=COLLECTION,
    query=models.Document(text="Phones with improved design", model=TEXT_MODEL),
    using="text_embedding",
    limit=1,
)
for point in results.points:
    payload = point.payload or {}
    print(point.score, payload["product_id"], payload["review"])
With the sample data, the top result is the review of product p_1, which talks about an improved phone design. The query shares few exact words with the review, which shows that the match comes from meaning rather than keywords.
CLIP maps text and images into the same space, so you can also search the image vectors with a text query. This needs the matching CLIP text encoder:
# CLIP maps text and images into the same space, so a text query can search
# the image vectors
results = client.query_points(
    collection_name=COLLECTION,
    query=models.Document(text="a smartwatch", model="Qdrant/clip-ViT-B-32-text"),
    using="image_embedding",
    limit=1,
)
for point in results.points:
    payload = point.payload or {}
    print(point.score, payload["image_source"])
With the placeholder squares from Step 2, this search returns an arbitrary product. With real product photos, it returns the image that best matches the description.
Next Steps
You now have an ingestion pipeline with no framework between S3 and Qdrant. To extend it:
- Ingest other formats, such as PDFs or audio, by adding a reader function for each.
- Process new files only, instead of the whole bucket, by keeping track of the object keys or
ETagvalues you have already ingested. The Incremental Embedding Updates tutorial shows one approach. - Combine the two vectors in one query with hybrid and multi-vector search.
- Add payload indexes and filter searches by product.
 Ready to try Qdrant?