
Build a Search API with Qdrant’s FastEmbed
| Time: 20 min | Level: Beginner | Output: GitHub |
|---|
This tutorial shows you how to build and deploy your own hybrid search service to look through descriptions of companies from startups-list.com and pick the most similar ones to your query. The website contains the company names, descriptions, locations, and a picture for each entry.
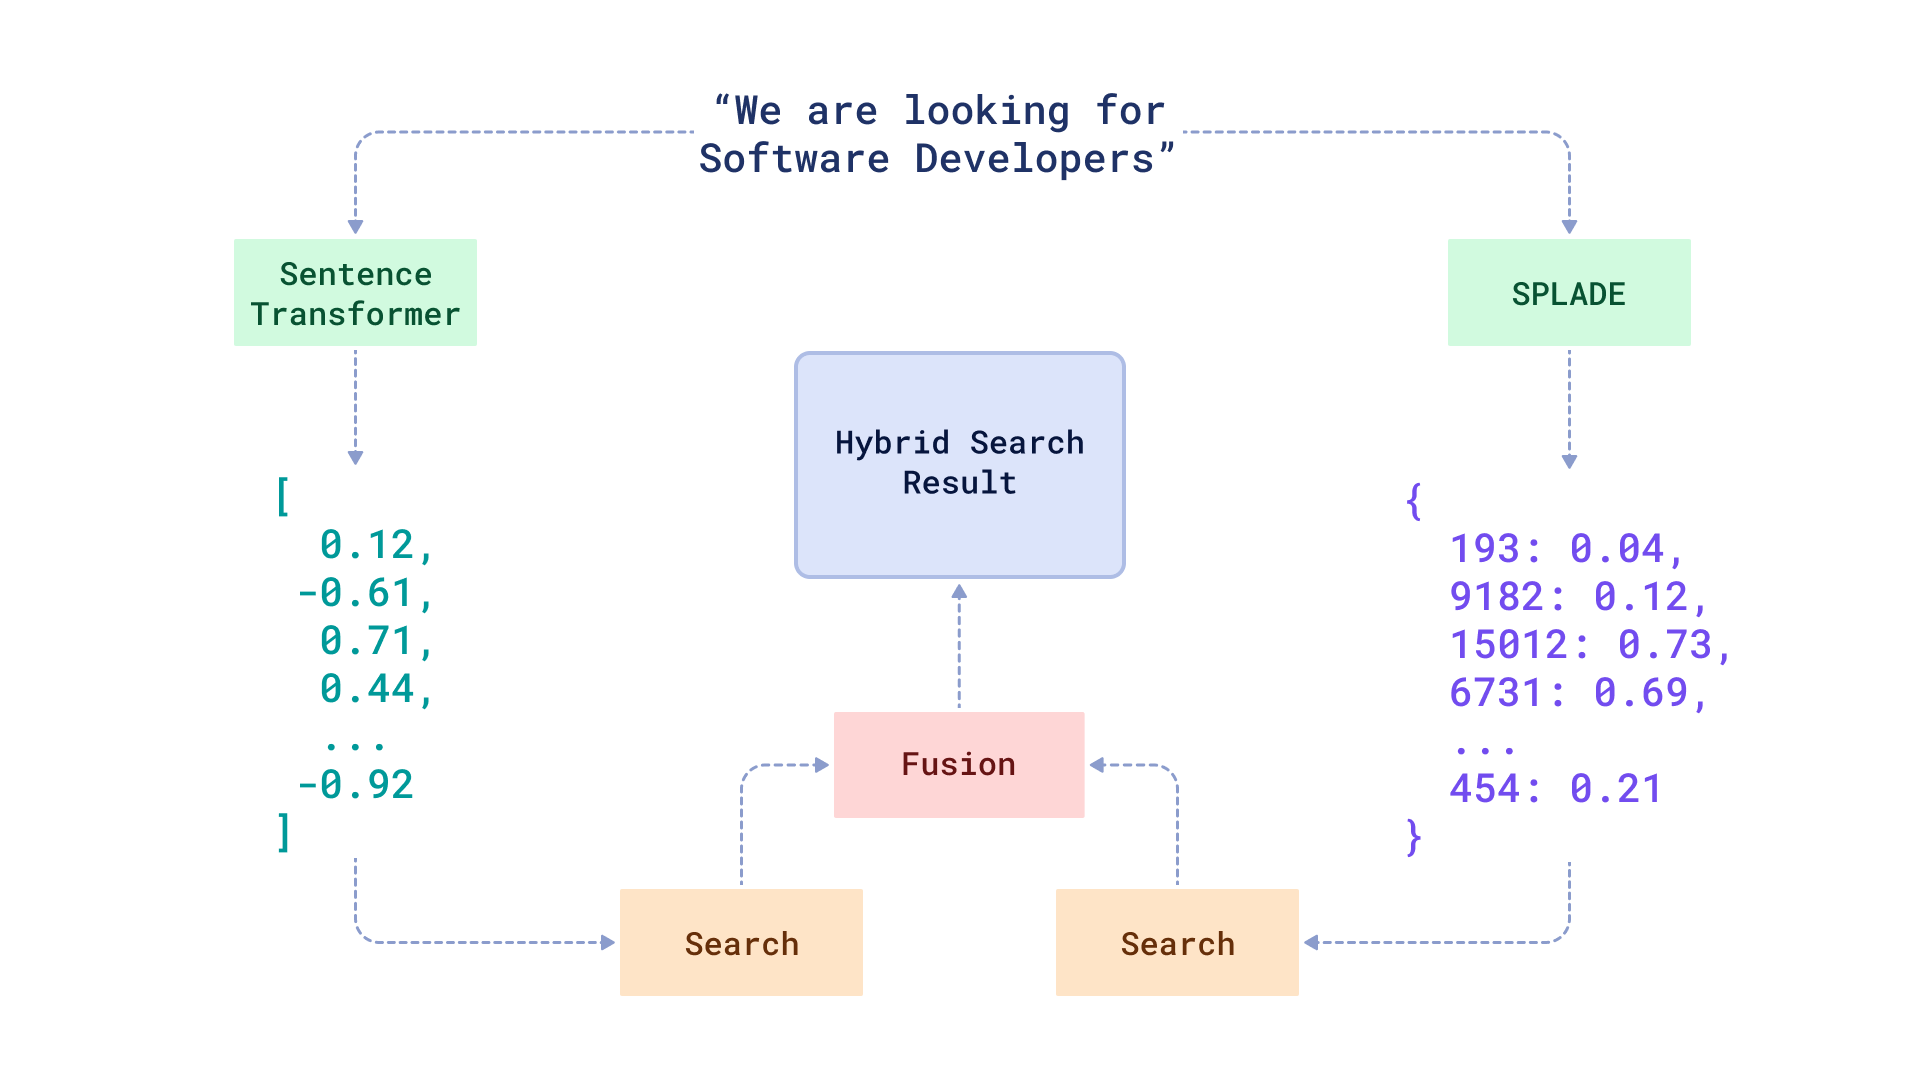
As explained in our hybrid search guide, there is no single definition of hybrid search. In this tutorial we are covering the case with a combination of dense and sparse embeddings. The former ones refer to the embeddings generated by such well-known neural networks as BERT, while the latter ones are more related to a traditional full-text search approach.
Our hybrid search service will use Fastembed package to generate embeddings of text descriptions and FastAPI to serve the search API. Fastembed natively integrates with Qdrant client, so you can easily upload the data into Qdrant and perform search queries.
Workflow
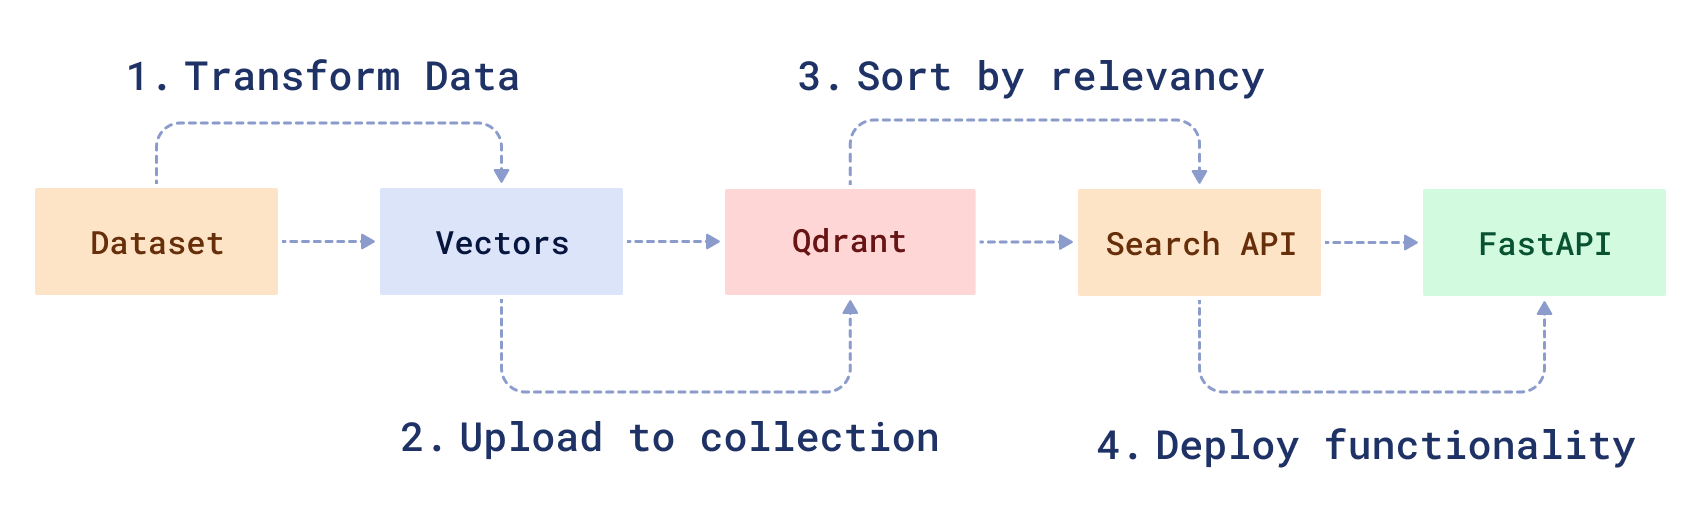
To create a hybrid search service, you will need to transform your raw data and then create a search function to manipulate it. First, you will 1) download and prepare a sample dataset using a modified version of the BERT ML model. Then, you will 2) load the data into Qdrant, 3) create a hybrid search API and 4) serve it using FastAPI.
Prerequisites
To complete this tutorial, you will need:
- A Qdrant Cloud account for a Free Tier Qdrant Cloud Cluster. To run Qdrant on your own machine instead, you need Docker.
- Raw parsed data from startups-list.com.
- Python 3.10 or later
Prepare sample dataset
To conduct a hybrid search on startup descriptions, you must first encode the description data into vectors. Fastembed integration into qdrant client combines encoding and uploading into a single step.
It also takes care of batching and parallelization, so you don’t have to worry about it.
Let’s start by downloading the data and installing the necessary packages.
- First you need to download the dataset.
wget https://storage.googleapis.com/generall-shared-data/startups_demo.json
# Use a small sample for the first run. Keep the full file for a larger import.
head -n 100 startups_demo.json > startups_sample.json
Create a Qdrant Cloud Cluster
Next, you need to manage all of your data using a vector engine. Qdrant lets you store, update or delete created vectors. Most importantly, it lets you search for the nearest vectors via a convenient API.
Note: Before you begin, create a project directory and a virtual python environment in it.
- Register for a Qdrant Cloud account using your email, Google, or GitHub credentials.
- Under Create a Free Cluster, enter a cluster name and select your preferred cloud provider and region. Click Create Free Cluster.
- Copy the API key when prompted and store it somewhere safe, as it won’t be displayed again.
- Copy the Cluster Endpoint. It should look something like
https://xxx.cloud.qdrant.io. - Store both as environment variables in your terminal, so the code can read them.
export QDRANT_URL="https://xxx.cloud.qdrant.io"
export QDRANT_API_KEY="your-api-key"
Note: Free clusters are suspended automatically after 1 week without use, and deleted after 4 weeks of inactivity if you don’t reactivate them. If your cluster stops responding when you return to this tutorial, check its status in the Cloud Console. Refer to Free Clusters.
In this tutorial, FastEmbed generates the dense and sparse vectors in your Python process and uploads them to your cluster.
Run Qdrant Locally Instead
To run Qdrant on your own machine, use Docker instead of a Cloud cluster.
- Download the Qdrant image from DockerHub.
docker pull qdrant/qdrant
- Start Qdrant inside of Docker.
docker run -p 6333:6333 \
    -v $(pwd)/qdrant_storage:/qdrant/storage \
    qdrant/qdrant
You should see output like this
...
[2021-02-05T00:08:51Z INFO  actix_server::builder] Starting 12 workers
[2021-02-05T00:08:51Z INFO  actix_server::builder] Starting "actix-web-service-0.0.0.0:6333" service on 0.0.0.0:6333
Test the service by going to http://localhost:6333/. You should see the Qdrant version info in your browser.
All data uploaded to Qdrant is saved inside the ./qdrant_storage directory and will be persisted even if you recreate the container.
Then set QDRANT_URL to http://localhost:6333 and leave QDRANT_API_KEY unset. Create the client in the next section with QdrantClient(url=os.environ["QDRANT_URL"], api_key=os.environ.get("QDRANT_API_KEY")), which works for both setups.
Upload data to Qdrant
- Install the official Python client to best interact with Qdrant.
pip install "qdrant-client[fastembed]>=1.14.2" tqdm
Note: This tutorial requires fastembed of version >=0.6.1.
At this point, you should have 100 startup records in the startups_sample.json file and a Qdrant Cloud cluster.
Now you need to write a script to upload all startup data and vectors into the search engine.
- Create a client object for Qdrant.
import os

# Import client library
from qdrant_client import QdrantClient, models

client = QdrantClient(
    url=os.environ["QDRANT_URL"],
    api_key=os.environ.get("QDRANT_API_KEY"),
)
- Choose models to encode your data and prepare collections.
In this tutorial, we will be using two pre-trained models to compute dense and sparse vectors correspondingly
The models are: sentence-transformers/all-MiniLM-L6-v2 and prithivida/Splade_PP_en_v1.
As soon as the choice is made, we need to configure a collection in Qdrant.
dense_vector_name = "dense"
sparse_vector_name = "sparse"
dense_model_name = "sentence-transformers/all-MiniLM-L6-v2"
sparse_model_name = "prithivida/Splade_PP_en_v1"
if not client.collection_exists("startups"):
    client.create_collection(
        collection_name="startups",
        vectors_config={
            dense_vector_name: models.VectorParams(
                size=client.get_embedding_size(dense_model_name),
                distance=models.Distance.COSINE
            )
        },  # size and distance are model dependent
        sparse_vectors_config={sparse_vector_name: models.SparseVectorParams()},
    )
Qdrant requires vectors to have their own names and configurations.
Parameters size and distance are mandatory, however, you can additionally specify extended configuration for your vectors, like quantization_config or hnsw_config.
- Read data from the file.
import json

payload_path = "startups_sample.json"
documents = []
metadata = []

with open(payload_path) as fd:
    for line in fd:
        obj = json.loads(line)
        description = obj["description"]
        dense_document = models.Document(text=description, model=dense_model_name)
        sparse_document = models.Document(text=description, model=sparse_model_name)
        documents.append(
            {
                dense_vector_name: dense_document,
                sparse_vector_name: sparse_document,
            }
        )
        metadata.append(obj)
In this block of code, we read data from startups_sample.json file and split it into two list: documents and metadata.
Documents are models with descriptions of startups and model names to embed data. Metadata is payload associated with each startup, such as the name, location, and picture.
We will use documents to encode the data into vectors.
- Encode and upload data.
from tqdm import tqdm

client.upload_collection(
    collection_name="startups",
    vectors=documents,
    payload=metadata,
    ids=tqdm(range(len(documents))),
    parallel=1,
)
The upload_collection method will encode all documents and upload them to Qdrant.
The example uses parallel=1 to upload in one process. Before increasing it, check memory use and Python multiprocessing requirements.
The upload uses stable IDs, so rerunning it updates the same points. The progress bar counts processed records. For the full import, set payload_path to "startups_demo.json".
Build the search API
Now that all the preparations are complete, let’s start building a neural search class.
In order to process incoming requests, the hybrid search class will need 3 things: 1) models to convert the query into a vector, 2) the Qdrant client to perform search queries, 3) fusion function to re-rank dense and sparse search results.
Qdrant supports 2 fusion functions for combining the results: reciprocal rank fusion and distribution based score fusion
- Create a file named
hybrid_searcher.pyand specify the following.
import os

from qdrant_client import QdrantClient, models


class HybridSearcher:
    DENSE_MODEL = "sentence-transformers/all-MiniLM-L6-v2"
    SPARSE_MODEL = "prithivida/Splade_PP_en_v1"
    DENSE_VECTOR_NAME = "dense"
    SPARSE_VECTOR_NAME = "sparse"

    def __init__(self, collection_name):
        self.collection_name = collection_name
        self.qdrant_client = QdrantClient(
            url=os.environ["QDRANT_URL"],
            api_key=os.environ.get("QDRANT_API_KEY"),
        )

    def search(self, text: str):
        points = self.qdrant_client.query_points(
            collection_name=self.collection_name,
            prefetch=[
                models.Prefetch(
                    query=models.Document(text=text, model=self.DENSE_MODEL),
                    using=self.DENSE_VECTOR_NAME,
                    limit=20,
                ),
                models.Prefetch(
                    query=models.Document(text=text, model=self.SPARSE_MODEL),
                    using=self.SPARSE_VECTOR_NAME,
                    limit=20,
                ),
            ],
            query=models.FusionQuery(fusion=models.Fusion.RRF),
            limit=5,
        ).points
        return [point.payload for point in points]
The prefetches retrieve up to 20 candidates each. Reciprocal rank fusion combines their rankings, and the final query returns five results.
- Add search filters.
With Qdrant it is also feasible to add some conditions to the search. For example, if you wanted to search for startups in a certain city, the search query could look like this:
    ...

    city_of_interest = "Chicago"

    # Define a filter for cities
    city_filter = models.Filter(
        must=[
            models.FieldCondition(
                key="city",
                match=models.MatchValue(value=city_of_interest)
            )
        ]
    )

    # NOTE: it is not a hybrid search! It's just a dense query for simplicity
    search_result = self.qdrant_client.query_points(
        collection_name=self.collection_name,
        query=models.Document(text=text, model=self.DENSE_MODEL),
        using=self.DENSE_VECTOR_NAME,
        query_filter=city_filter,
        limit=5
    ).points
    ...
You have now created a class for neural search queries. Now wrap it up into a service.
Deploy the search with FastAPI
To build the service you will use the FastAPI framework.
- Install FastAPI.
To install it, use the command
pip install fastapi uvicorn
- Implement the service.
Create a file named service.py and specify the following.
The service will have only one API endpoint and will look like this:
from fastapi import FastAPI

# The file where HybridSearcher is stored
from hybrid_searcher import HybridSearcher

app = FastAPI()

# Create a neural searcher instance
hybrid_searcher = HybridSearcher(collection_name="startups")


@app.get("/api/search")
def search_startup(q: str):
    return {"result": hybrid_searcher.search(text=q)}


if __name__ == "__main__":
    import uvicorn

    uvicorn.run(app, host="0.0.0.0", port=8000)
- Run the service in the terminal where you set
QDRANT_URLandQDRANT_API_KEY.
python service.py
- Open your browser at http://localhost:8000/docs.
You should be able to see a debug interface for your service.
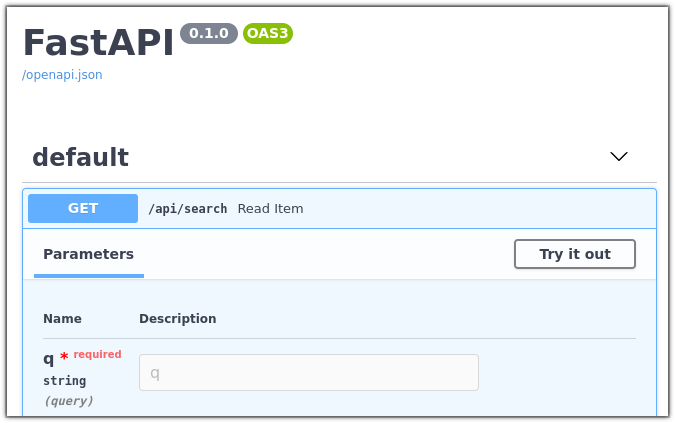
Test the API with a query such as delivery. The response contains a result list with up to five startup records from the sample. Each record includes the original name, description, and city. The tested sample returned records including WeDeliver and ShipBob.
curl 'http://localhost:8000/api/search?q=delivery'
The first upload and search download embedding models. This uses disk space and CPU time, but requires no paid API account. Stop the FastAPI process when finished. If you ran Qdrant locally, also stop the tutorial’s Docker container, and remove the tutorial’s qdrant_storage directory only if you no longer need its data. If you used a Qdrant Cloud cluster, you can delete it when you no longer need it.
The 100-record workflow, repeat upload, hybrid API request, and city filter were tested against a local Qdrant instance on November 5, 2026 with Qdrant 1.20.0, qdrant-client 1.20.0, FastEmbed 0.9.1, FastAPI 0.162.0, and Python 3.12.
Join our Discord community, where we talk about vector search and similarity learning, publish other examples of neural networks and neural search applications.
 Ready to try Qdrant?