
Securing and Exposing a Hybrid Cloud Cluster
A new Qdrant cluster on Hybrid Cloud starts with no API key and no TLS, and that’s by design: the cluster only lives on a ClusterIP Service inside your Kubernetes network by default, so it isn’t reachable from outside your cluster in the first place. The moment you expose it, internally or externally, you’re responsible for securing it.
This tutorial walks through that process end to end, on a real cluster: enabling authentication, adding TLS at the database, and terminating TLS at an ingress controller in front of it.
Prerequisites
- A running Hybrid Cloud cluster with
kubectlaccess configured. opensslfor generating an API key.mkcertfor generating a self-signed TLS certificate (oropenssldirectly, see later).- Helm, if you don’t already have an ingress controller installed.
Set your cluster name once so the commands below can reference it:
export KUBENS="your-kubernetes-namespace"
export CLUSTER_NAME=$(kubectl get qdrantclusters -n $KUBENS -o jsonpath='{.items[0].metadata.name}')
Check the Starting State
Confirm what’s actually running before changing anything:
kubectl get svc -n $KUBENS
You should see a ClusterIP Service for the cluster and no EXTERNAL-IP. Then check the cluster spec for any existing auth or TLS configuration:
kubectl get qdrantcluster $CLUSTER_NAME -n $KUBENS -o yaml
On a fresh cluster, spec.config won’t have an api_key or TLS field yet.
Enable API Key Authentication
Generate a key and store it as a Kubernetes secret:
API_KEY=$(openssl rand -hex 24)

kubectl create secret generic qdrant-api-key \
  --from-literal=api-key=$API_KEY \
  --namespace $KUBENS
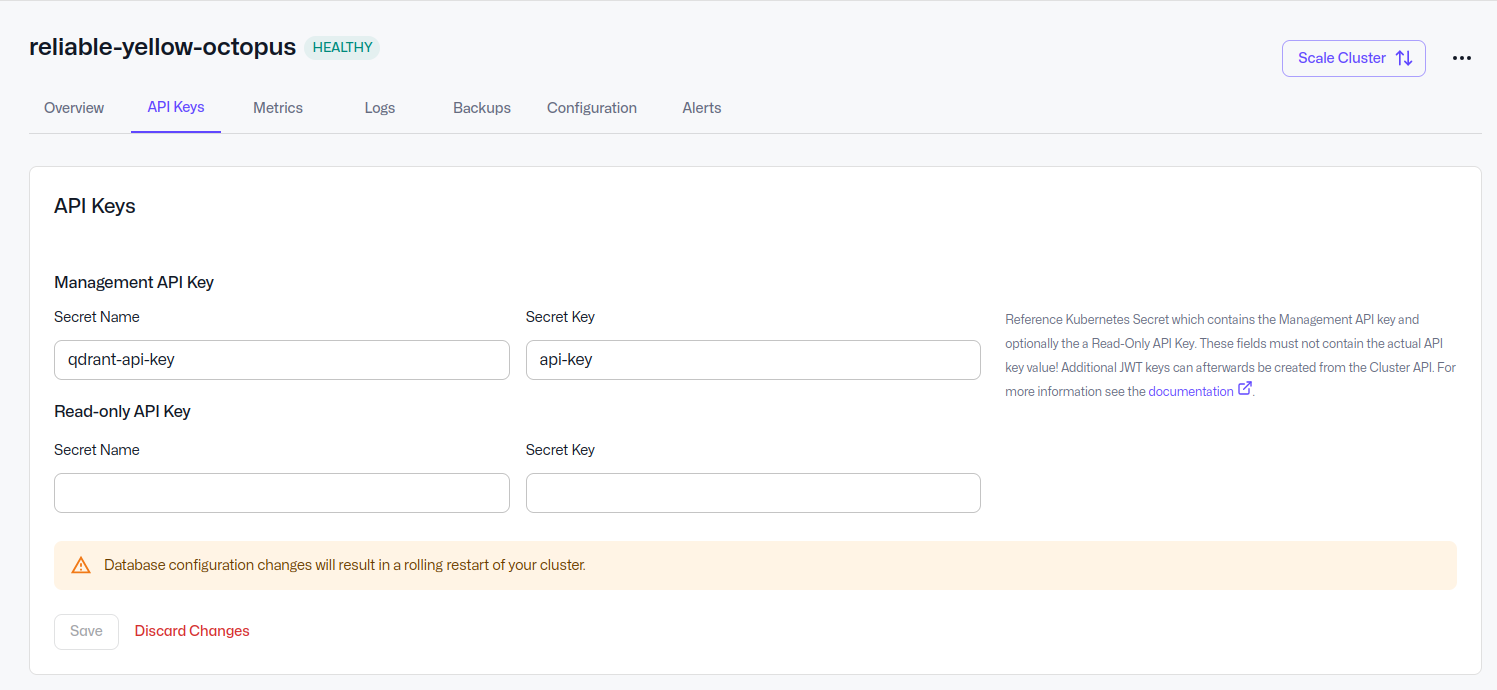
In the Cluster Detail page, go to Configuration → API Keys and create a Management API Key (or a Read-Only API Key, depending on your needs), referencing the qdrant-api-key secret and its api-key key, per Authentication to your Qdrant Clusters. Save, then confirm the config was patched:
kubectl get qdrantcluster $CLUSTER_NAME -n $KUBENS -o yaml | grep -A5 "service:"
Verify
Port-forward to the cluster and confirm a request without the key is rejected, and a request with it succeeds:
kubectl port-forward -n $KUBENS svc/$CLUSTER_NAME 6333:6333
curl -i http://localhost:6333/collections
# HTTP/1.1 401 Unauthorized

curl -i http://localhost:6333/collections -H "api-key: $API_KEY"
# HTTP/1.1 200 OK
Add TLS at the Qdrant Level
In this step, we will need to generate an SSL certificate: for this tutorial we will be using a self-signed one from mkcert, which is fine for testing but should not be used in production. Use a certificate from your internal CA or a public issuer like Let’s Encrypt instead, keeping in mind Let’s Encrypt can’t issue certificates for internal Kubernetes DNS names, which matters if you also configure peer-to-peer TLS between nodes.
mkcert -install
mkcert -cert-file qdrant.crt -key-file qdrant.key localhost 127.0.0.1 $CLUSTER_NAME.$KUBENS.svc.cluster.local

kubectl create secret tls qdrant-tls \
  --cert=qdrant.crt \
  --key=qdrant.key \
  --namespace $KUBENS
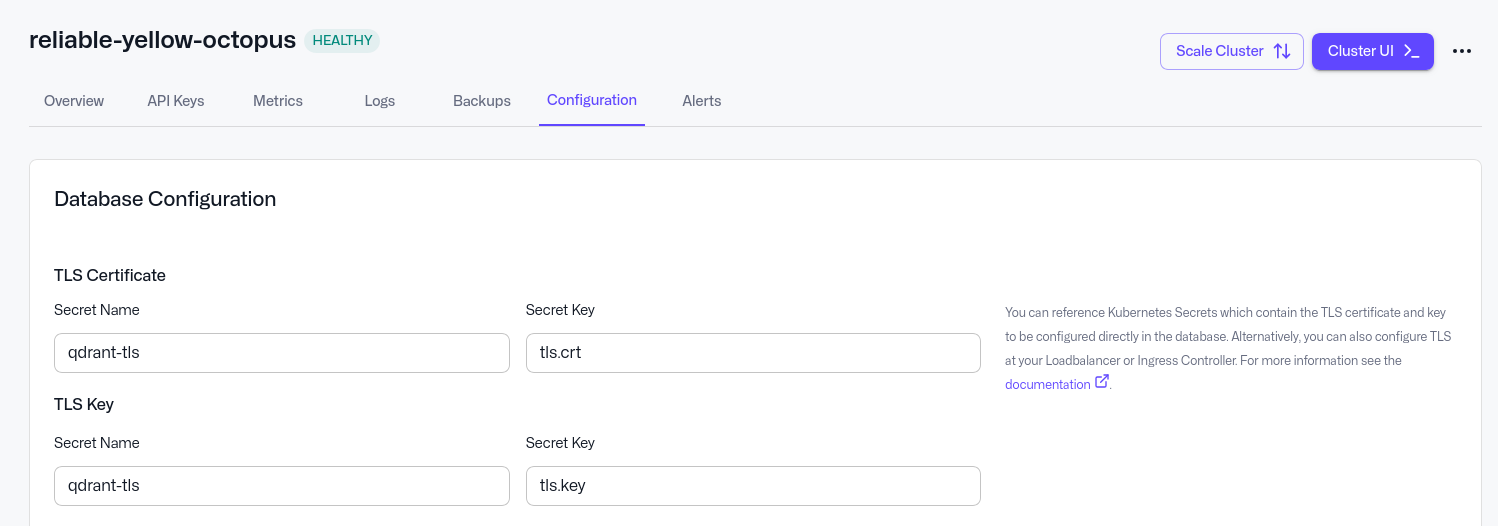
As with the API key, reference this secret through the Cloud Console rather than patching the CR directly: Configuration → TLS, secret qdrant-tls, keys tls.crt / tls.key, per Configuring TLS.
Verify
Saving the TLS configuration triggers a rolling restart of the cluster. The port-forward you opened earlier stays attached to the old pod, so it stops working once that pod is replaced. Wait for the new pods to be ready:
kubectl get pods -n $KUBENS -w
Then stop the old port-forward (Ctrl+C) and open a new one:
kubectl port-forward -n $KUBENS svc/$CLUSTER_NAME 6333:6333
Call the cluster over plain HTTP first:
curl -i http://localhost:6333/collections -H "api-key: $API_KEY"
Expect this request to fail with a TLS or connection error, because Qdrant now only accepts HTTPS on this port. The exact curl message depends on your curl build and TLS library, for example Received HTTP/0.9 when not allowed or Empty reply from server. Switch to HTTPS and the request succeeds:
curl -ik https://localhost:6333/collections -H "api-key: $API_KEY"
# HTTP/2 200
-k skips certificate verification, needed here only because the cert is self-signed and its root wasn’t trusted in this shell.
Expose the Cluster Through an Ingress
Qdrant now speaks TLS, but to reach it from outside the Kubernetes cluster, we need to put an ingress controller in front of it, terminating or passing through TLS at the edge. This tutorial uses Traefik, which works the same way across cloud providers.
If you don’t already have it installed:
helm repo add traefik https://traefik.github.io/charts
helm repo update

helm install traefik traefik/traefik \
  --namespace traefik \
  --create-namespace
Verify that the service is available and get the external IP:
kubectl get svc -n traefik
This creates a LoadBalancer-type Service, which means your cloud provider provisions a real external load balancer for it. That has a cost, so don’t leave test infrastructure like this running if you don’t need it. Note the EXTERNAL-IP (or hostname, on AWS) once it’s assigned, which can take a minute or two.
Trust Qdrant’s Certificate
Since Qdrant already has TLS on with a self-signed certificate, Traefik needs to be told to trust it, or the connection between Traefik and the Qdrant instance will fail. Create a ServersTransport resource for this:
kubectl apply -f - <<EOF
apiVersion: traefik.io/v1alpha1
kind: ServersTransport
metadata:
  name: qdrant-insecure-transport
  namespace: $KUBENS
spec:
  insecureSkipVerify: true
EOF
In production, replace the self-signed certificate with one from a trusted CA and drop this resource entirely, along with the annotation that references it below.
Configure the backend connection
Traefik needs two pieces of configuration to reach an HTTPS backend: which protocol scheme to use, and which ServersTransport to trust it with. Both go on the Qdrant Service, not the Ingress, and you can configure them directly from the Cloud UI, under Configuration → Kubernetes Configuration → Service Annotations:
| Key | Value |
|---|---|
| traefik.ingress.kubernetes.io/service.serversscheme | https |
| traefik.ingress.kubernetes.io/service.serverstransport | <your-namespace>-qdrant-insecure-transport@kubernetescrd |
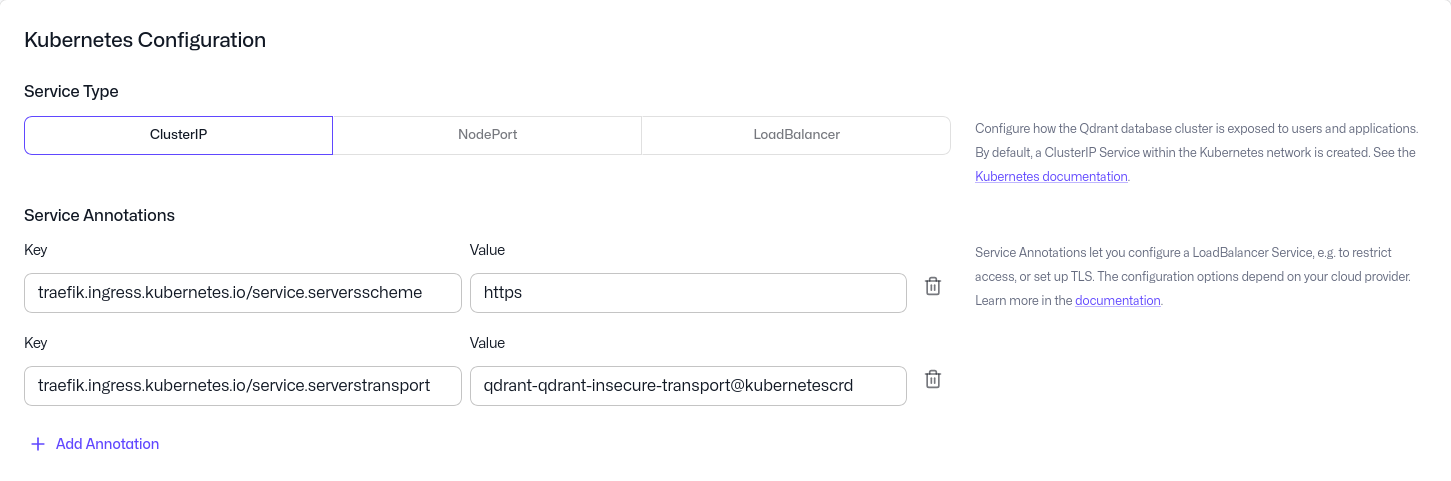
The serverstransport value has to follow Traefik’s <namespace>-<name>@kubernetescrd format, so it changes with the namespace you created the ServersTransport in. Print the exact value for your setup with:
echo "$KUBENS-qdrant-insecure-transport@kubernetescrd"
Create the ingress
kubectl apply -f - <<EOF
apiVersion: networking.k8s.io/v1
kind: Ingress
metadata:
  name: qdrant-ingress
  namespace: $KUBENS
spec:
  ingressClassName: traefik
  rules:
  - host: qdrant.<your-ingress-external-ip>.sslip.io
    http:
      paths:
      - path: /
        pathType: Prefix
        backend:
          service:
            name: $CLUSTER_NAME
            port:
              number: 6333
EOF
The host field doesn’t create DNS, it’s a string Traefik matches against the incoming request’s Host header. Nothing resolves qdrant.local or any other placeholder domain unless DNS actually points somewhere. sslp.io is a wildcard DNS service that resolves anything.<ip>.sslip.io to <ip> automatically, useful for testing without owning a domain or configuring DNS. In production, replace it with a real domain pointed at your ingress’s external address.
Verify
curl -ik https://qdrant.<your-ingress-external-ip>.sslip.io/collections -H "api-key: $API_KEY"
# HTTP/2 200
This request goes through two TLS connections, each with its own certificate. Between Traefik and Qdrant, Traefik uses the mkcert certificate you created earlier and skips verification through the ServersTransport. Between your client and Traefik, the Ingress has no tls: block, so Traefik serves its own default self-signed certificate (TRAEFIK DEFAULT CERT). The -k flag hides that second certificate from you. Run the same command with -v instead of -k to see which certificate Traefik presents.
Next Steps
This covers authentication and TLS for a single cluster reachable from outside your Kubernetes network. From here, two things are worth doing before this goes to production:
- replace both self-signed certificates with ones from a trusted CA: the
mkcertcertificate on Qdrant (then drop theServersTransportand its annotation), and Traefik’s default certificate at the edge (add atls:block to the Ingress that references a certificate for your domain) - set up a domain (and related DNS records) for the ingress-controller to resolve to
To further configure, scale and upgrade your cluster, check out the dedicated documentation
 Ready to try Qdrant?