# Semantic Search Basics
# Semantic Search Basics with Qdrant
| Time: 30 min | Level: Beginner | Output: [GitHub](https://github.com/qdrant/qdrant_demo/tree/sentense-transformers) | [](https://colab.research.google.com/drive/1kPktoudAP8Tu8n8l-iVMOQhVmHkWV_L9?usp=sharing) |
| --- | ----------- | ----------- |----------- |
This tutorial shows you how to build and deploy your own neural search service to look through descriptions of companies from [startups-list.com](https://www.startups-list.com/) and pick the most similar ones to your query. The website contains the company names, descriptions, locations, and a picture for each entry.
A neural search service uses artificial neural networks to improve the accuracy and relevance of search results. Besides offering simple keyword results, this system can retrieve results by meaning. It can understand and interpret complex search queries and provide more contextually relevant output, effectively enhancing the user's search experience.
## Workflow
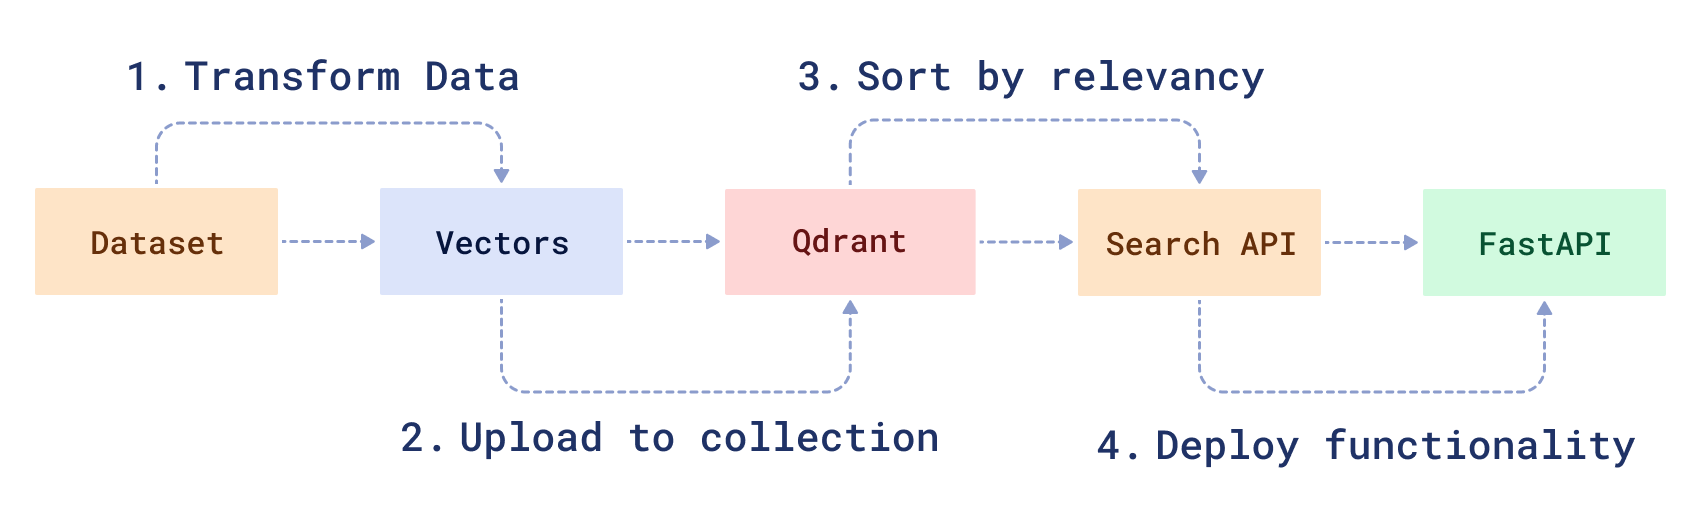
To create a neural search service, you will need to transform your raw data and then create a search function to manipulate it. First, you will 1) download and prepare a sample dataset using a modified version of the BERT ML model. Then, you will 2) load the data into Qdrant, 3) create a neural search API and 4) serve it using FastAPI.
> **Note**: The code for this tutorial can be found here: | [Step 1: Data Preparation Process](https://colab.research.google.com/drive/1kPktoudAP8Tu8n8l-iVMOQhVmHkWV_L9?usp=sharing) | [Step 2: Full Code for Neural Search](https://github.com/qdrant/qdrant_demo/tree/sentense-transformers). |
## Prerequisites
To complete this tutorial, you will need:
- Docker - The easiest way to use Qdrant is to run a pre-built Docker image.
- [Raw parsed data](https://storage.googleapis.com/generall-shared-data/startups_demo.json) from startups-list.com.
- Python version >=3.8
## Prepare sample dataset
To conduct a neural search on startup descriptions, you must first encode the description data into vectors. To process text, you can use a pre-trained models like [BERT](https://en.wikipedia.org/wiki/BERT_(language_model)) or sentence transformers. The [sentence-transformers](https://github.com/UKPLab/sentence-transformers) library lets you conveniently download and use many pre-trained models, such as DistilBERT, MPNet, etc.
1. First you need to download the dataset.
```bash
wget https://storage.googleapis.com/generall-shared-data/startups_demo.json
```
2. Install the SentenceTransformer library as well as other relevant packages.
```bash
pip install sentence-transformers numpy pandas tqdm
```
3. Import the required modules.
```python
from sentence_transformers import SentenceTransformer
import numpy as np
import json
import pandas as pd
from tqdm.notebook import tqdm
```
You will be using a pre-trained model called `all-MiniLM-L6-v2`.
This is a performance-optimized sentence embedding model and you can read more about it and other available models [here](https://www.sbert.net/docs/pretrained_models.html).
4. Download and create a pre-trained sentence encoder.
```python
model = SentenceTransformer(
"all-MiniLM-L6-v2", device="cuda"
) # or device="cpu" if you don't have a GPU
```
5. Read the raw data file.
```python
df = pd.read_json("./startups_demo.json", lines=True)
```
6. Encode all startup descriptions to create an embedding vector for each. Internally, the `encode` function will split the input into batches, which will significantly speed up the process.
```python
vectors = model.encode(
[row.alt + ". " + row.description for row in df.itertuples()],
show_progress_bar=True,
)
```
All of the descriptions are now converted into vectors. There are 40474 vectors of 384 dimensions. The output layer of the model has this dimension
```python
vectors.shape
# > (40474, 384)
```
7. Download the saved vectors into a new file named `startup_vectors.npy`
```python
np.save("startup_vectors.npy", vectors, allow_pickle=False)
```
## Run Qdrant in Docker
Next, you need to manage all of your data using a vector engine. Qdrant lets you store, update or delete created vectors. Most importantly, it lets you search for the nearest vectors via a convenient API.
> **Note:** Before you begin, create a project directory and a virtual python environment in it.
1. Download the Qdrant image from DockerHub.
```bash
docker pull qdrant/qdrant
```
2. Start Qdrant inside of Docker.
```bash
docker run -p 6333:6333 \
-v $(pwd)/qdrant_storage:/qdrant/storage \
qdrant/qdrant
```
You should see output like this
```text
...
[2021-02-05T00:08:51Z INFO actix_server::builder] Starting 12 workers
[2021-02-05T00:08:51Z INFO actix_server::builder] Starting "actix-web-service-0.0.0.0:6333" service on 0.0.0.0:6333
```
Test the service by going to [http://localhost:6333/](http://localhost:6333/). You should see the Qdrant version info in your browser.
All data uploaded to Qdrant is saved inside the `./qdrant_storage` directory and will be persisted even if you recreate the container.
## Upload data to Qdrant
1. Install the official Python client to best interact with Qdrant.
```bash
pip install qdrant-client
```
At this point, you should have startup records in the `startups_demo.json` file, encoded vectors in `startup_vectors.npy` and Qdrant running on a local machine.
Now you need to write a script to upload all startup data and vectors into the search engine.
2. Create a client object for Qdrant.
```python
# Import client library
from qdrant_client import QdrantClient
from qdrant_client.models import VectorParams, Distance
client = QdrantClient("http://localhost:6333")
```
3. Related vectors need to be added to a collection. Create a new collection for your startup vectors.
```python
if not client.collection_exists("startups"):
client.create_collection(
collection_name="startups",
vectors_config=VectorParams(size=384, distance=Distance.COSINE),
)
```
4. Create an iterator over the startup data and vectors.
The Qdrant client library defines a special function that allows you to load datasets into the service.
However, since there may be too much data to fit a single computer memory, the function takes an iterator over the data as input.
```python
fd = open("./startups_demo.json")
# payload is now an iterator over startup data
payload = map(json.loads, fd)
# Load all vectors into memory, numpy array works as iterable for itself.
# Other option would be to use Mmap, if you don't want to load all data into RAM
vectors = np.load("./startup_vectors.npy")
```
5. Upload the data
```python
client.upload_collection(
collection_name="startups",
vectors=vectors,
payload=payload,
ids=None, # Vector ids will be assigned automatically
batch_size=256, # How many vectors will be uploaded in a single request?
)
```
Vectors are now uploaded to Qdrant.
## Build the search API
Now that all the preparations are complete, let's start building a neural search class.
In order to process incoming requests, neural search will need 2 things: 1) a model to convert the query into a vector and 2) the Qdrant client to perform search queries.
1. Create a file named `neural_searcher.py` and specify the following.
```python
from qdrant_client import QdrantClient
from sentence_transformers import SentenceTransformer
class NeuralSearcher:
def __init__(self, collection_name):
self.collection_name = collection_name
# Initialize encoder model
self.model = SentenceTransformer("all-MiniLM-L6-v2", device="cpu")
# initialize Qdrant client
self.qdrant_client = QdrantClient("http://localhost:6333")
```
2. Write the search function.
```python
def search(self, text: str):
# Convert text query into vector
vector = self.model.encode(text).tolist()
# Use `vector` for search for closest vectors in the collection
search_result = self.qdrant_client.query_points(
collection_name=self.collection_name,
query=vector,
query_filter=None, # If you don't want any filters for now
limit=5, # 5 the most closest results is enough
).points
# `search_result` contains found vector ids with similarity scores along with the stored payload
# In this function you are interested in payload only
payloads = [hit.payload for hit in search_result]
return payloads
```
3. Add search filters.
With Qdrant it is also feasible to add some conditions to the search.
For example, if you wanted to search for startups in a certain city, the search query could look like this:
```python
from qdrant_client.models import Filter
...
city_of_interest = "Berlin"
# Define a filter for cities
city_filter = Filter(**{
"must": [{
"key": "city", # Store city information in a field of the same name
"match": { # This condition checks if payload field has the requested value
"value": city_of_interest
}
}]
})
search_result = self.qdrant_client.query_points(
collection_name=self.collection_name,
query=vector,
query_filter=city_filter,
limit=5
).points
...
```
You have now created a class for neural search queries. Now wrap it up into a service.
## Deploy the search with FastAPI
To build the service you will use the FastAPI framework.
1. Install FastAPI.
To install it, use the command
```bash
pip install fastapi uvicorn
```
2. Implement the service.
Create a file named `service.py` and specify the following.
The service will have only one API endpoint and will look like this:
```python
from fastapi import FastAPI
# The file where NeuralSearcher is stored
from neural_searcher import NeuralSearcher
app = FastAPI()
# Create a neural searcher instance
neural_searcher = NeuralSearcher(collection_name="startups")
@app.get("/api/search")
def search_startup(q: str):
return {"result": neural_searcher.search(text=q)}
if __name__ == "__main__":
import uvicorn
uvicorn.run(app, host="0.0.0.0", port=8000)
```
3. Run the service.
```bash
python service.py
```
4. Open your browser at [http://localhost:8000/docs](http://localhost:8000/docs).
You should be able to see a debug interface for your service.

Feel free to play around with it, make queries regarding the companies in our corpus, and check out the results.
## Next steps
The code from this tutorial has been used to develop a [live online demo](https://qdrant.to/semantic-search-demo).
You can try it to get an intuition for cases when the neural search is useful.
The demo contains a switch that selects between neural and full-text searches.
You can turn the neural search on and off to compare your result with a regular full-text search.
> **Note**: The code for this tutorial can be found here: | [Step 1: Data Preparation Process](https://colab.research.google.com/drive/1kPktoudAP8Tu8n8l-iVMOQhVmHkWV_L9?usp=sharing) | [Step 2: Full Code for Neural Search](https://github.com/qdrant/qdrant_demo/tree/sentense-transformers). |
Join our [Discord community](https://qdrant.to/discord), where we talk about vector search and similarity learning, publish other examples of neural networks and neural search applications.