
Send S3 Data to Qdrant Vector Store with LangChain
| Time: 30 min | Level: Beginner |
|---|
Data ingestion into a vector store is essential for building effective search and retrieval algorithms, especially since nearly 80% of data is unstructured, lacking any predefined format.
In this tutorial, we’ll create a streamlined data ingestion pipeline, pulling data directly from AWS S3 and feeding it into Qdrant. We’ll dive into vector embeddings, transforming unstructured data into a format that allows you to search documents semantically. Prepare to discover new ways to uncover insights hidden within unstructured data!
Ingestion Workflow Architecture
We’ll set up a powerful document ingestion and analysis pipeline in this workflow using cloud storage, natural language processing (NLP) tools, and embedding technologies. Starting with raw data in an S3 bucket, we’ll preprocess it with LangChain, apply embedding APIs for both text and images and store the results in Qdrant – a vector database optimized for similarity search.
Figure 1: Data Ingestion Workflow Architecture
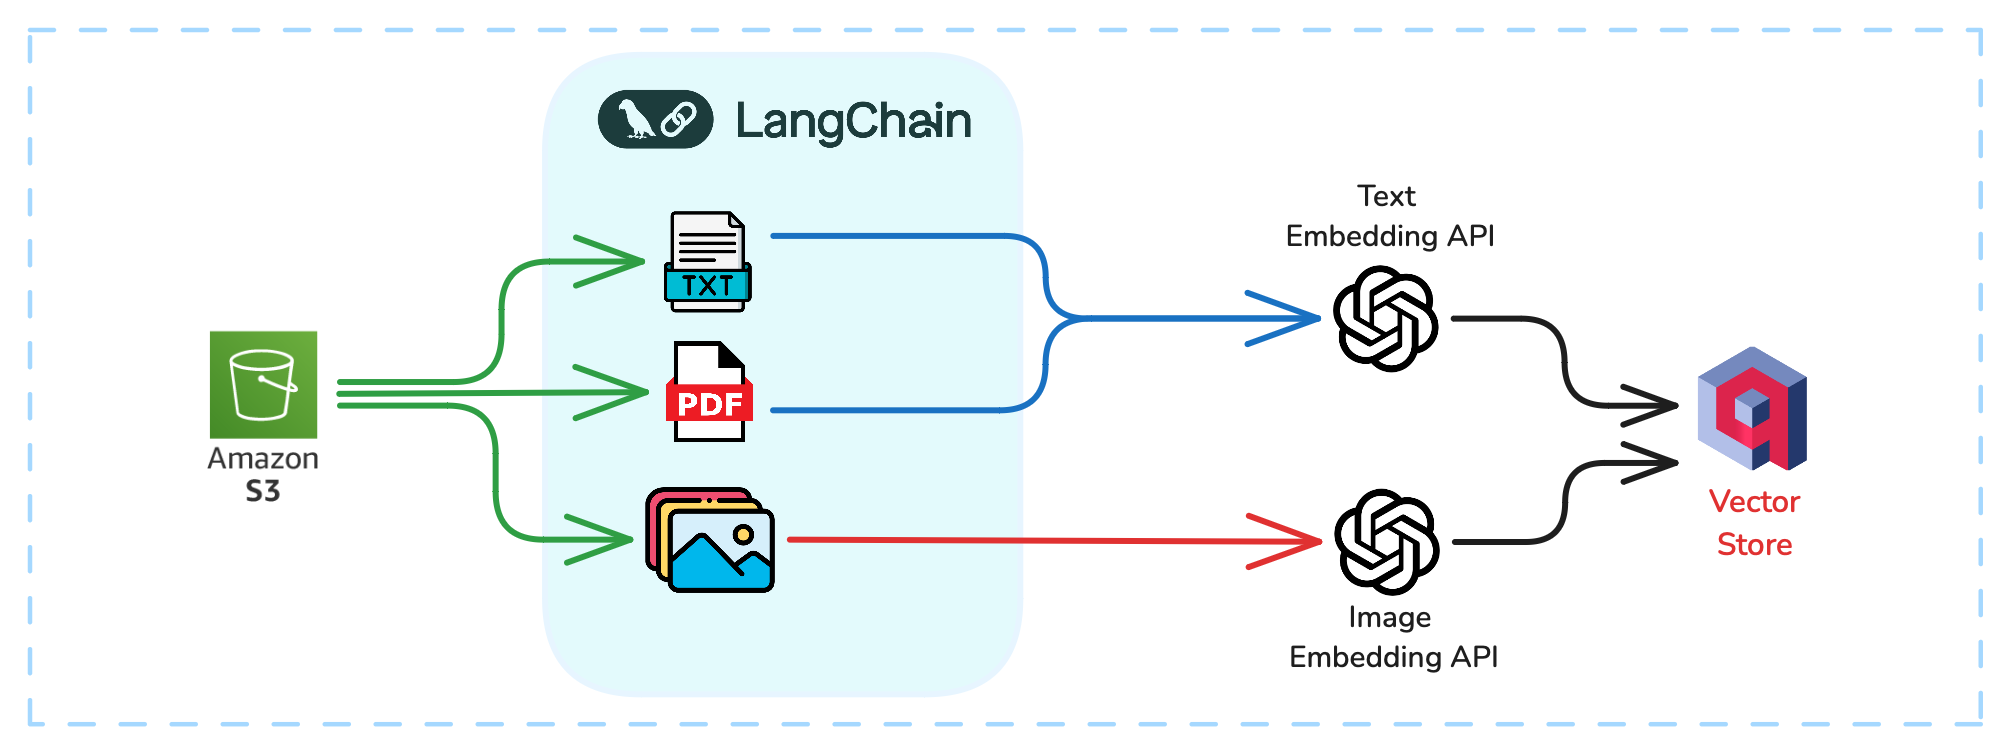
Let’s break down each component of this workflow:
- S3 Bucket: This is our starting point—a centralized, scalable storage solution for various file types like PDFs, images, and text.
- LangChain: Acting as the pipeline’s orchestrator, LangChain handles extraction, preprocessing, and manages data flow for embedding generation. It simplifies processing PDFs, so you won’t need to worry about applying OCR (Optical Character Recognition) here.
- Qdrant: As your vector database, Qdrant stores embeddings and their payloads, enabling efficient similarity search and retrieval across all content types.
Prerequisites

In this section, you’ll get a step-by-step guide on ingesting data from an S3 bucket. But before we dive in, let’s make sure you’re set up with all the prerequisites:
| Sample Data | We’ll use a sample dataset, where each folder includes product reviews in text format along with corresponding images. |
| AWS Account | An active AWS account with access to S3 services. |
| Qdrant Cloud | A Qdrant Cloud account with access to the WebUI for managing collections and running queries. |
| LangChain | You will use this popular framework to tie everything together. |
Supported Document Types
The documents used for ingestion can be of various types, such as PDFs, text files, or images. We will organize a structured S3 bucket with folders with the supported document types for testing and experimentation.
Python Environment
Ensure you have a Python environment (Python 3.9 or higher) with these libraries installed:
boto3
langchain-community
langchain
python-dotenv
unstructured
unstructured[pdf]
qdrant_client
fastembed
Access Keys: Store your AWS access key, S3 secret key, and Qdrant API key in a .env file for easy access. Here’s a sample .env file.
ACCESS_KEY = ""
SECRET_ACCESS_KEY = ""
QDRANT_KEY = ""
Step 1: Ingesting Data from S3

The LangChain framework makes it easy to ingest data from storage services like AWS S3, with built-in support for loading documents in formats such as PDFs, images, and text files.
To connect LangChain with S3, you’ll use the S3DirectoryLoader, which lets you load files directly from an S3 bucket into LangChain’s pipeline.
Example: Configuring LangChain to Load Files from S3
Here’s how to set up LangChain to ingest data from an S3 bucket:
from langchain_community.document_loaders import S3DirectoryLoader

# Initialize the S3 document loader
loader = S3DirectoryLoader(
   "product-dataset",  # S3 bucket name
   "p_1", #S3 Folder name containing the data for the first product
   aws_access_key_id=aws_access_key_id,  # AWS Access Key
   aws_secret_access_key=aws_secret_access_key  # AWS Secret Access Key
)

# Load documents from the specified S3 bucket
docs = loader.load()
Step 2. Turning Documents into Embeddings
Embeddings are the secret sauce here—they’re numerical representations of data (like text, images, or audio) that capture the “meaning” in a form that’s easy to compare. By converting text and images into embeddings, you’ll be able to perform similarity searches quickly and efficiently. Think of embeddings as the bridge to storing and retrieving meaningful insights from your data in Qdrant.
Models We’ll Use for Generating Embeddings
To get things rolling, we’ll use two powerful models:
sentence-transformers/all-MiniLM-L6-v2Embeddings for transforming text data.CLIP(Contrastive Language-Image Pretraining) for image data.
Document Processing Function

Next, we’ll define two functions — process_text and process_image to handle different file types in our document pipeline. The process_text function extracts and returns the raw content from a text-based document, while process_image retrieves an image from an S3 source and loads it into memory.
from PIL import Image

def process_text(doc):
    source = doc.metadata['source']  # Extract document source (e.g., S3 URL)

    text = doc.page_content  # Extract the content from the text file
    print(f"Processing text from {source}")
    return source, text

def process_image(doc):
    source = doc.metadata['source']  # Extract document source (e.g., S3 URL)
    print(f"Processing image from {source}")

    bucket_name, object_key = parse_s3_url(source)  # Parse the S3 URL
    response = s3.get_object(Bucket=bucket_name, Key=object_key)  # Fetch image from S3
    img_bytes = response['Body'].read()

    img = Image.open(io.BytesIO(img_bytes))
    return source, img
Helper Functions for Document Processing
To retrieve images from S3, a helper function parse_s3_url breaks down the S3 URL into its bucket and critical components. This is essential for fetching the image from S3 storage.
def parse_s3_url(s3_url):
    parts = s3_url.replace("s3://", "").split("/", 1)
    bucket_name = parts[0]
    object_key = parts[1]
    return bucket_name, object_key
Step 3: Loading Embeddings into Qdrant

Now that your documents have been processed and converted into embeddings, the next step is to load these embeddings into Qdrant.
Creating a Collection in Qdrant
In Qdrant, data is organized in collections, each representing a set of embeddings (or points) and their associated metadata (payload). To store the embeddings generated earlier, you’ll first need to create a collection.
Here’s how to create a collection in Qdrant to store both text and image embeddings:
def create_collection(collection_name):
    qdrant_client.create_collection(
        collection_name,
        vectors_config={
            "text_embedding": models.VectorParams(
                size=384,  # Dimension of text embeddings
                distance=models.Distance.COSINE,  # Cosine similarity is used for comparison
            ),
            "image_embedding": models.VectorParams(
                size=512,  # Dimension of image embeddings
                distance=models.Distance.COSINE,  # Cosine similarity is used for comparison
            ),
        },
    )

create_collection("products-data")
This function creates a collection for storing text (384 dimensions) and image (512 dimensions) embeddings, using cosine similarity to compare embeddings within the collection.
Once the collection is set up, you can load the embeddings into Qdrant. This involves inserting (or updating) the embeddings and their associated metadata (payload) into the specified collection.
Here’s the code for loading embeddings into Qdrant:
def ingest_data(points):
    operation_info = qdrant_client.upsert(
        collection_name="products-data",  # Collection where data is being inserted
        points=points
    )
    return operation_info
Explanation of Ingestion
- Upserting the Data Point: The upsert method on the
qdrant_clientinserts each PointStruct into the specified collection. If a point with the same ID already exists, it will be updated with the new values. - Operation Info: The function returns
operation_info, which contains details about the upsert operation, such as success status or any potential errors.
Running the Ingestion Code
Here’s how to call the function and ingest data:
from qdrant_client import models

if __name__ == "__main__":
    collection_name = "products-data"
    create_collection(collection_name)
    for i in range(1,6): # Five documents
        folder = f"p_{i}"
        loader = S3DirectoryLoader(
            "product-dataset",
            folder,
            aws_access_key_id=aws_access_key_id,
            aws_secret_access_key=aws_secret_access_key
        )
        docs = loader.load()
        points, text_review, product_image = [], "", ""
        for idx, doc in enumerate(docs):
            source = doc.metadata['source']
            if source.endswith(".txt") or source.endswith(".pdf"):
                _text_review_source, text_review = process_text(doc)
            elif source.endswith(".png"):
                product_image_source, product_image = process_image(doc)
        if text_review:
            point = models.PointStruct(
                id=idx,  # Unique identifier for each point
                vector={
                    "text_embedding": models.Document(
                        text=text_review, model="sentence-transformers/all-MiniLM-L6-v2"
                    ),
                    "image_embedding": models.Image(
                        image=product_image, model="Qdrant/clip-ViT-B-32-vision"
                    ),
                },
                payload={"review": text_review, "product_image": product_image_source},
            )
            points.append(point)
    operation_info = ingest_data(points)
    print(operation_info)
The PointStruct is instantiated with these key parameters:
id: A unique identifier for each embedding, typically an incremental index.
vector: A dictionary holding the text and image inputs to be embedded.
qdrant-clientuses FastEmbed under the hood to automatically generate vector representations from these inputs locally.payload: A dictionary storing additional metadata, like product reviews and image references, which is invaluable for retrieval and context during searches.
The code dynamically loads folders from an S3 bucket, processes text and image files separately, and stores their embeddings and associated data in dedicated lists. It then creates a PointStruct for each data entry and calls the ingestion function to load it into Qdrant.
Exploring the Qdrant WebUI Dashboard
Once the embeddings are loaded into Qdrant, you can use the WebUI dashboard to visualize and manage your collections. The dashboard provides a clear, structured interface for viewing collections and their data. Let’s take a closer look in the next section.
Step 4: Visualizing Data in Qdrant WebUI
To start visualizing your data in the Qdrant WebUI, head to the Overview section and select Access the database.
Figure 2: Accessing the Database from the Qdrant UI
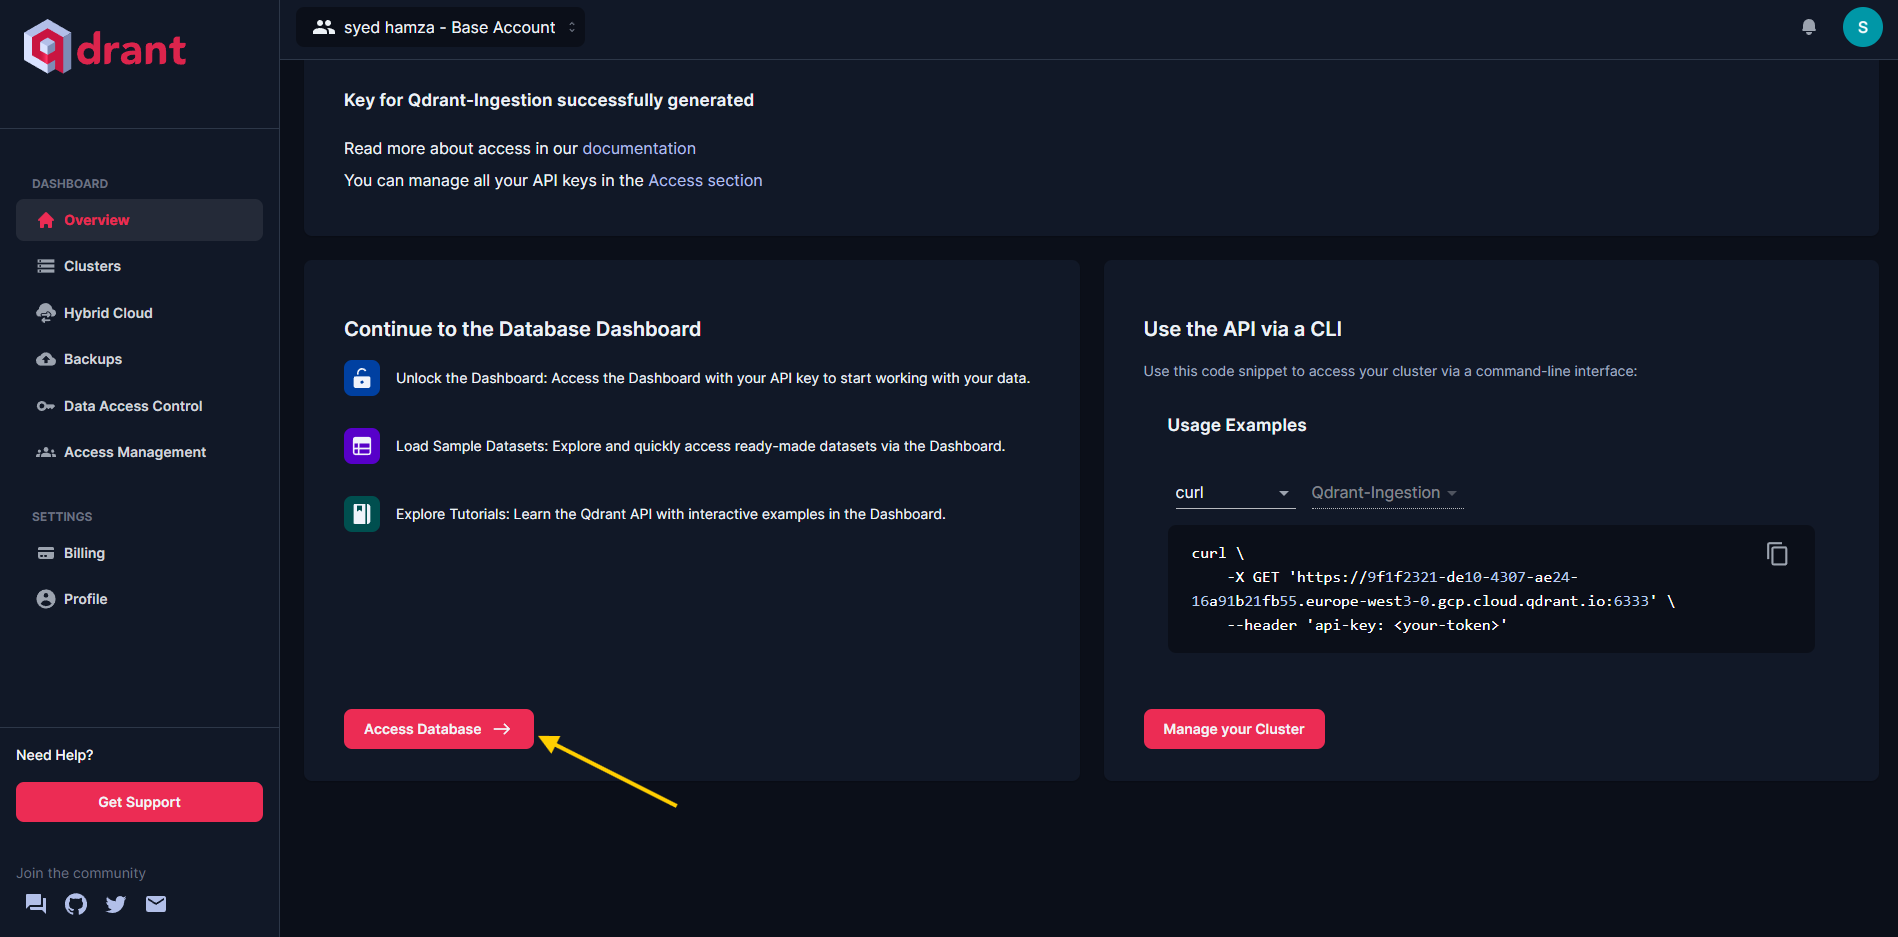
When prompted, enter your API key. Once inside, you’ll be able to view your collections and the corresponding data points. You should see your collection displayed like this:
Figure 3: The product-data Collection in Qdrant

Here’s a look at the most recent point ingested into Qdrant:
Figure 4: The Latest Point Added to the product-data Collection
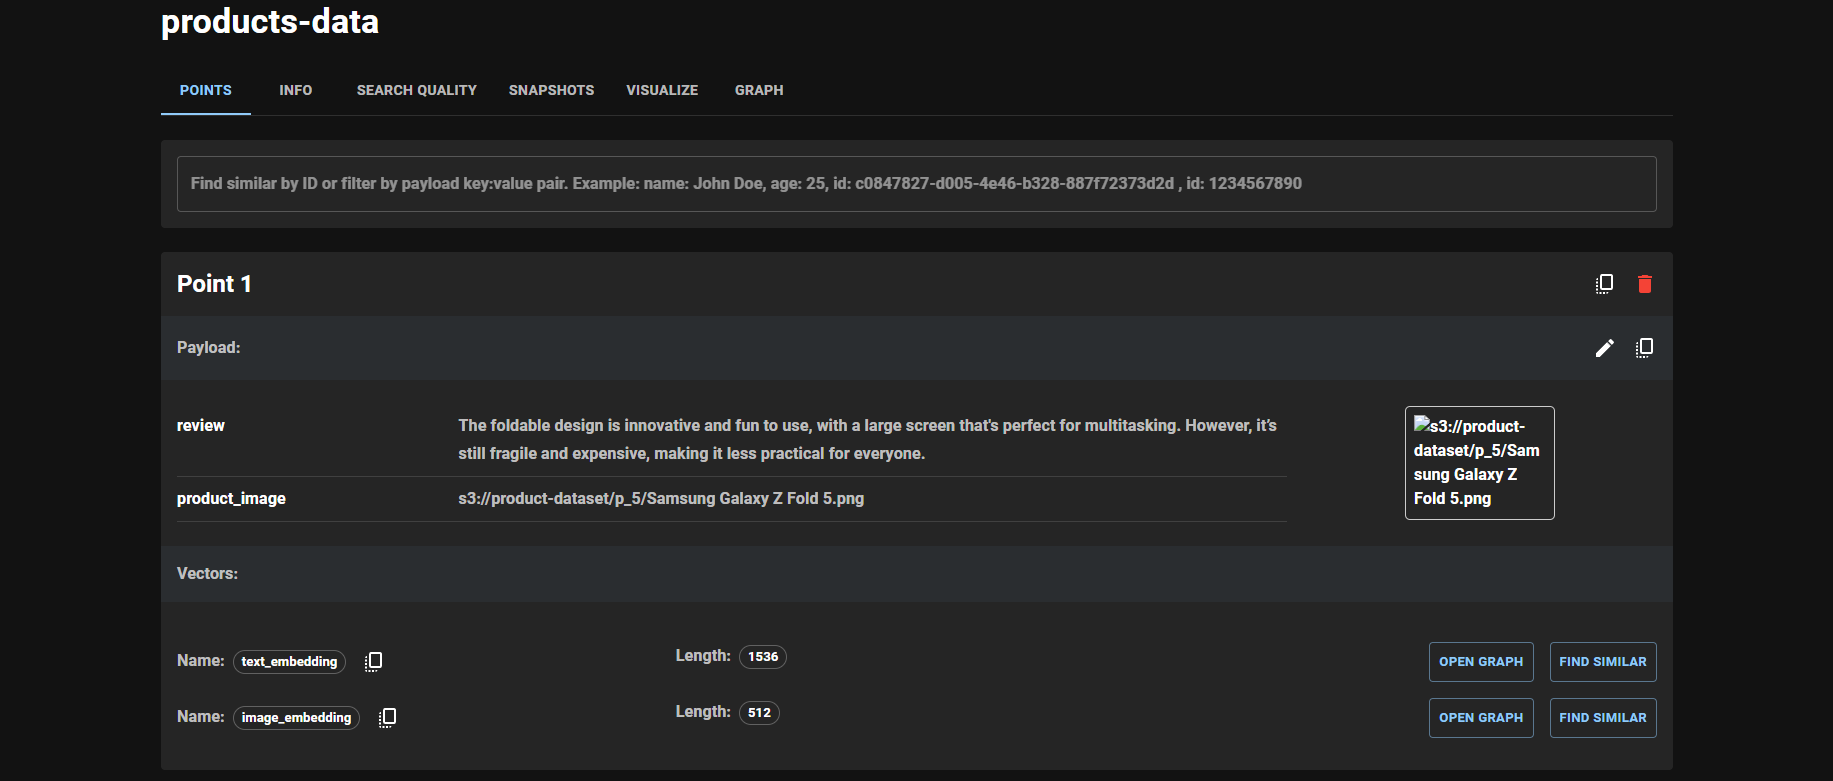
The Qdrant WebUI’s search functionality allows you to perform vector searches across your collections. With options to apply filters and parameters, retrieving relevant embeddings and exploring relationships within your data becomes easy. To start, head over to the Console in the left panel, where you can create queries:
Figure 5: Overview of Console in Qdrant
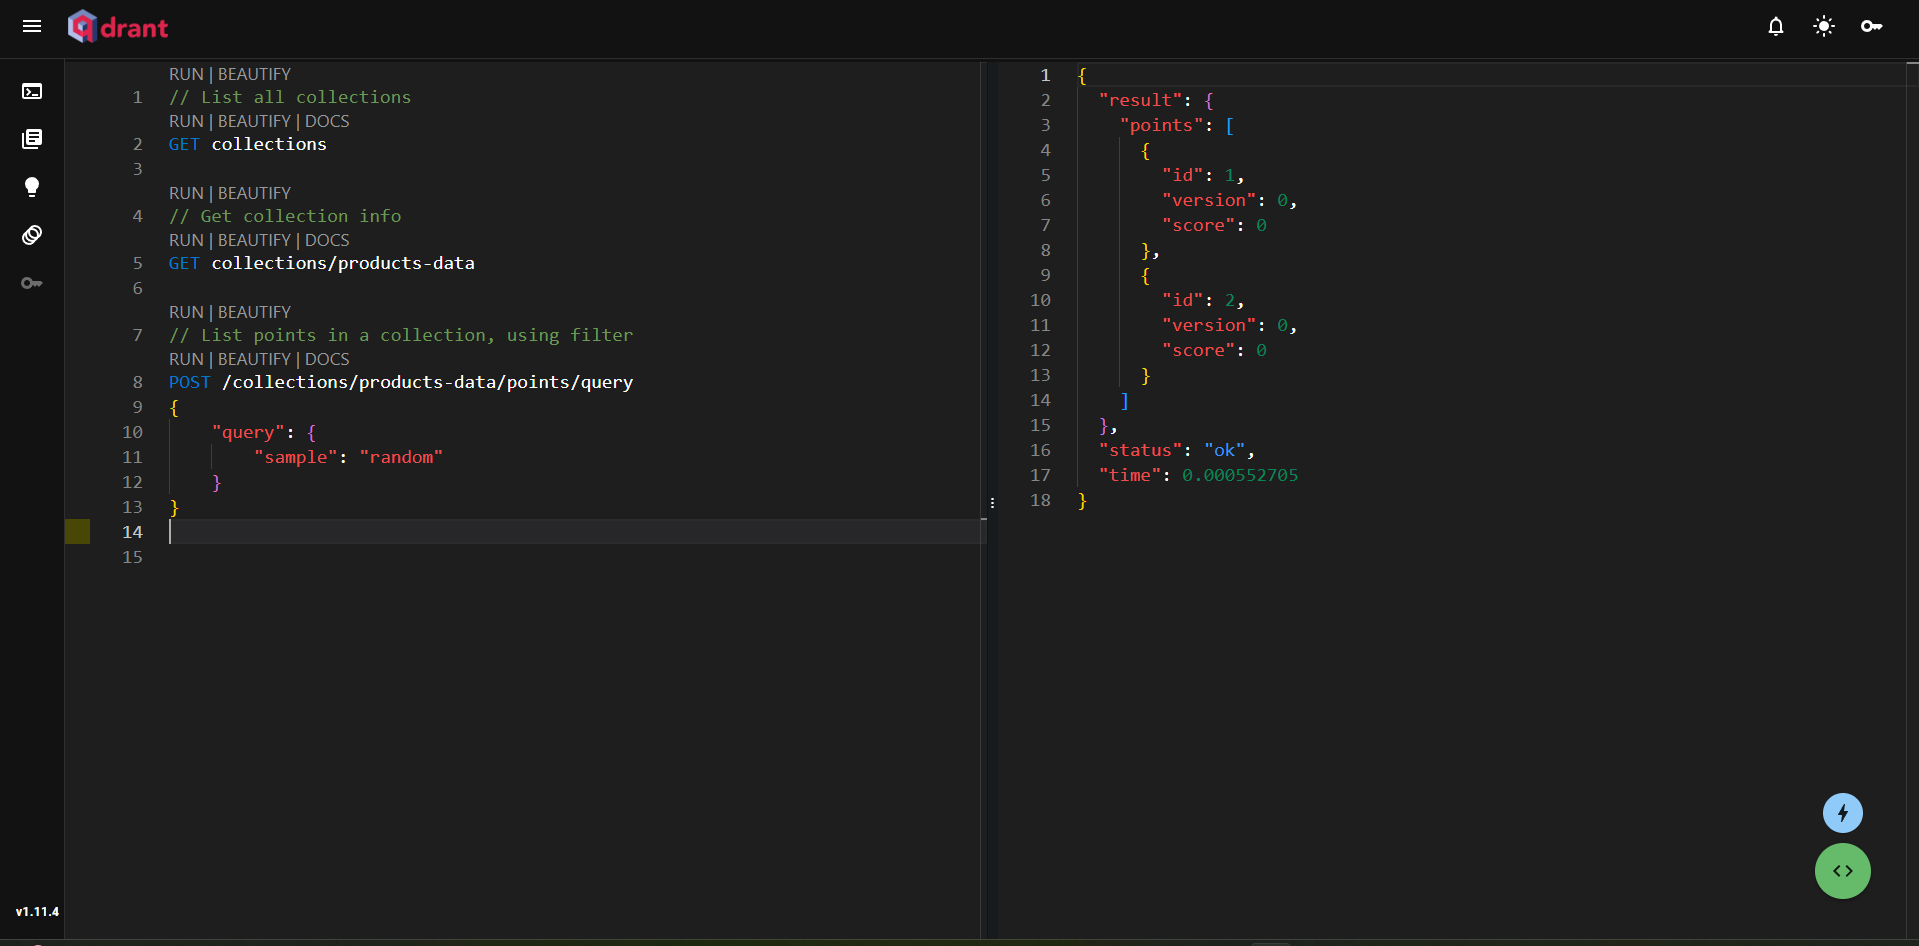
The first query retrieves all collections, the second fetches points from the product-data collection, and the third performs a sample query. This demonstrates how straightforward it is to interact with your data in the Qdrant UI.
Now, let’s retrieve some documents from the database using a query!.
Figure 6: Querying the Qdrant Client to Retrieve Relevant Documents
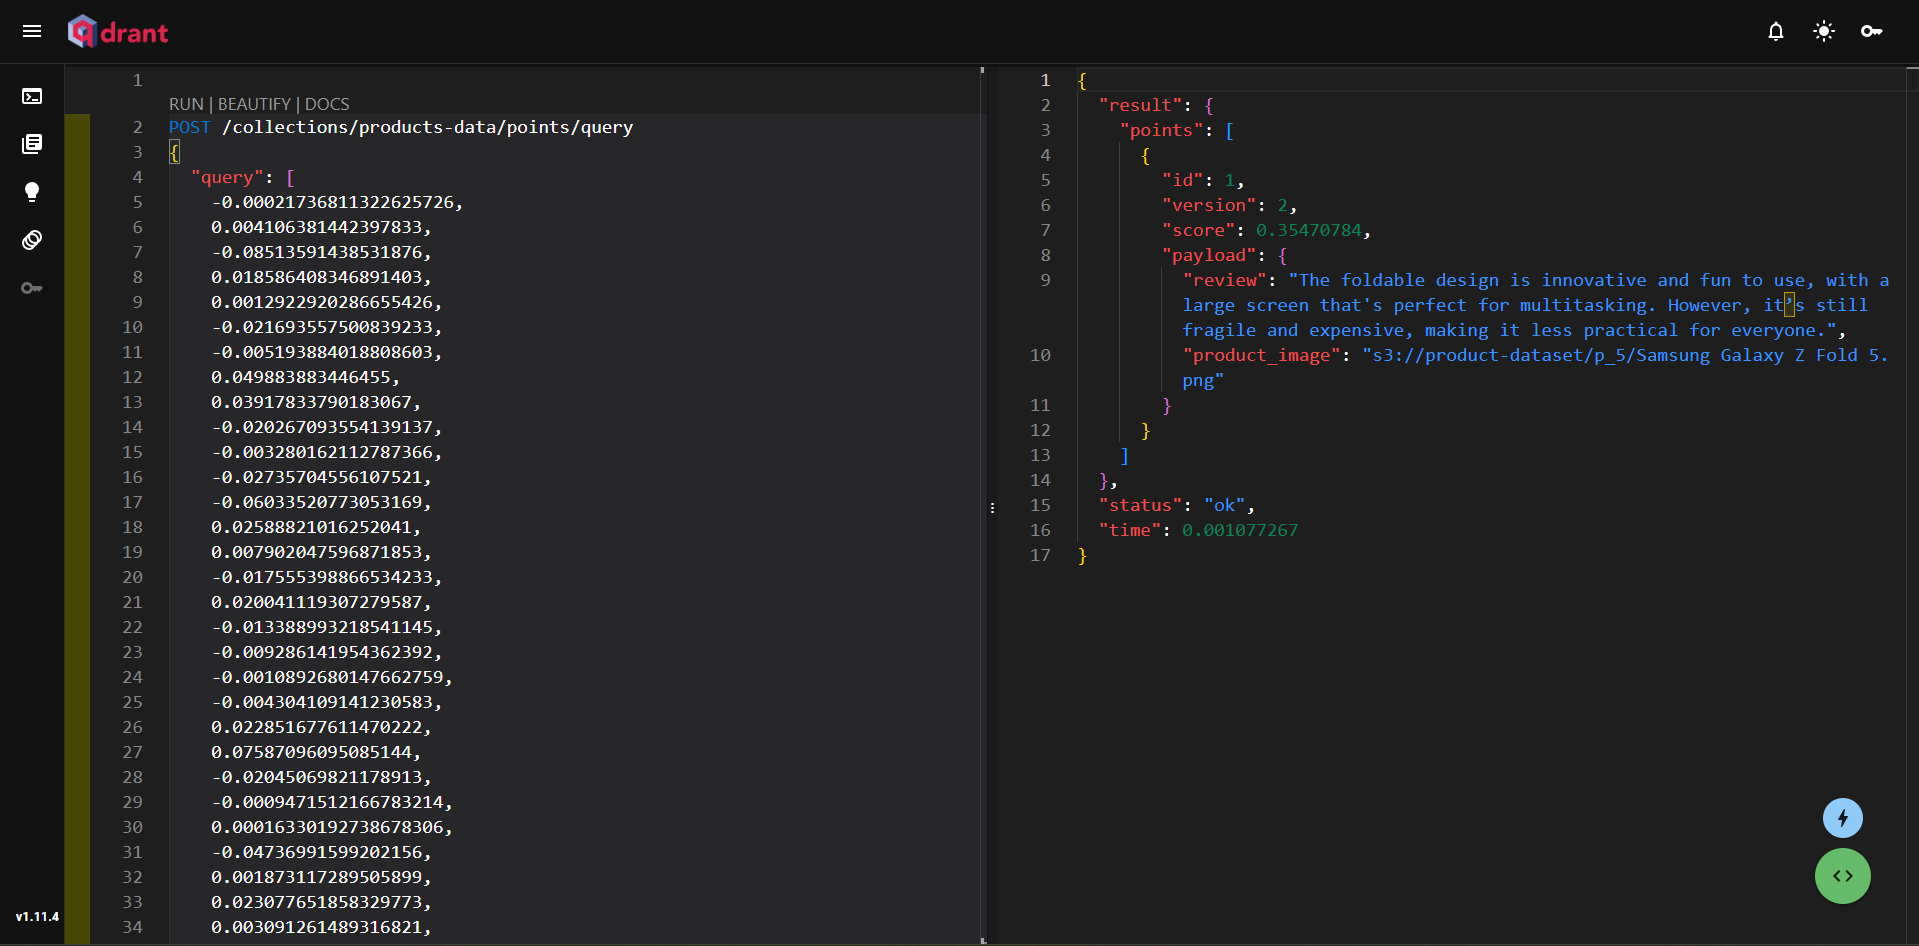
In this example, we queried Phones with improved design. Then, we converted the text to vectors using OpenAI and retrieved a relevant phone review highlighting design improvements.
Conclusion
In this guide, we set up an S3 bucket, ingested various data types, and stored embeddings in Qdrant. Using LangChain, we dynamically processed text and image files, making it easy to work with each file type.
Now, it’s your turn. Try experimenting with different data types, such as videos, and explore Qdrant’s advanced features to enhance your applications. To get started, sign up for Qdrant today.


