Ingest Databricks Data into Qdrant
| Time: 30 min | Level: Intermediate | Complete Notebook |
|---|
Databricks is a unified analytics platform for working with big data and AI. It’s built around Apache Spark, a powerful open-source distributed computing system well-suited for processing large-scale datasets and performing complex analytics tasks.
Apache Spark is designed to scale horizontally, meaning it can handle expensive operations like generating vector embeddings by distributing computation across a cluster of machines. This scalability is crucial when dealing with large datasets.
In this example, we will demonstrate how to vectorize a dataset with dense and sparse embeddings using Qdrant’s FastEmbed library. We will then load this vectorized data into a Qdrant cluster using the Qdrant Spark connector on Databricks.
Setting up a Databricks project
Set up a Databricks cluster following the official documentation guidelines.
Install the Qdrant Spark connector as a library:
Navigate to the
Librariessection in your cluster dashboard.Click on
Install Newat the top-right to open the library installation modal.Search for
io.qdrant:spark:VERSIONin the Maven packages and click onInstall.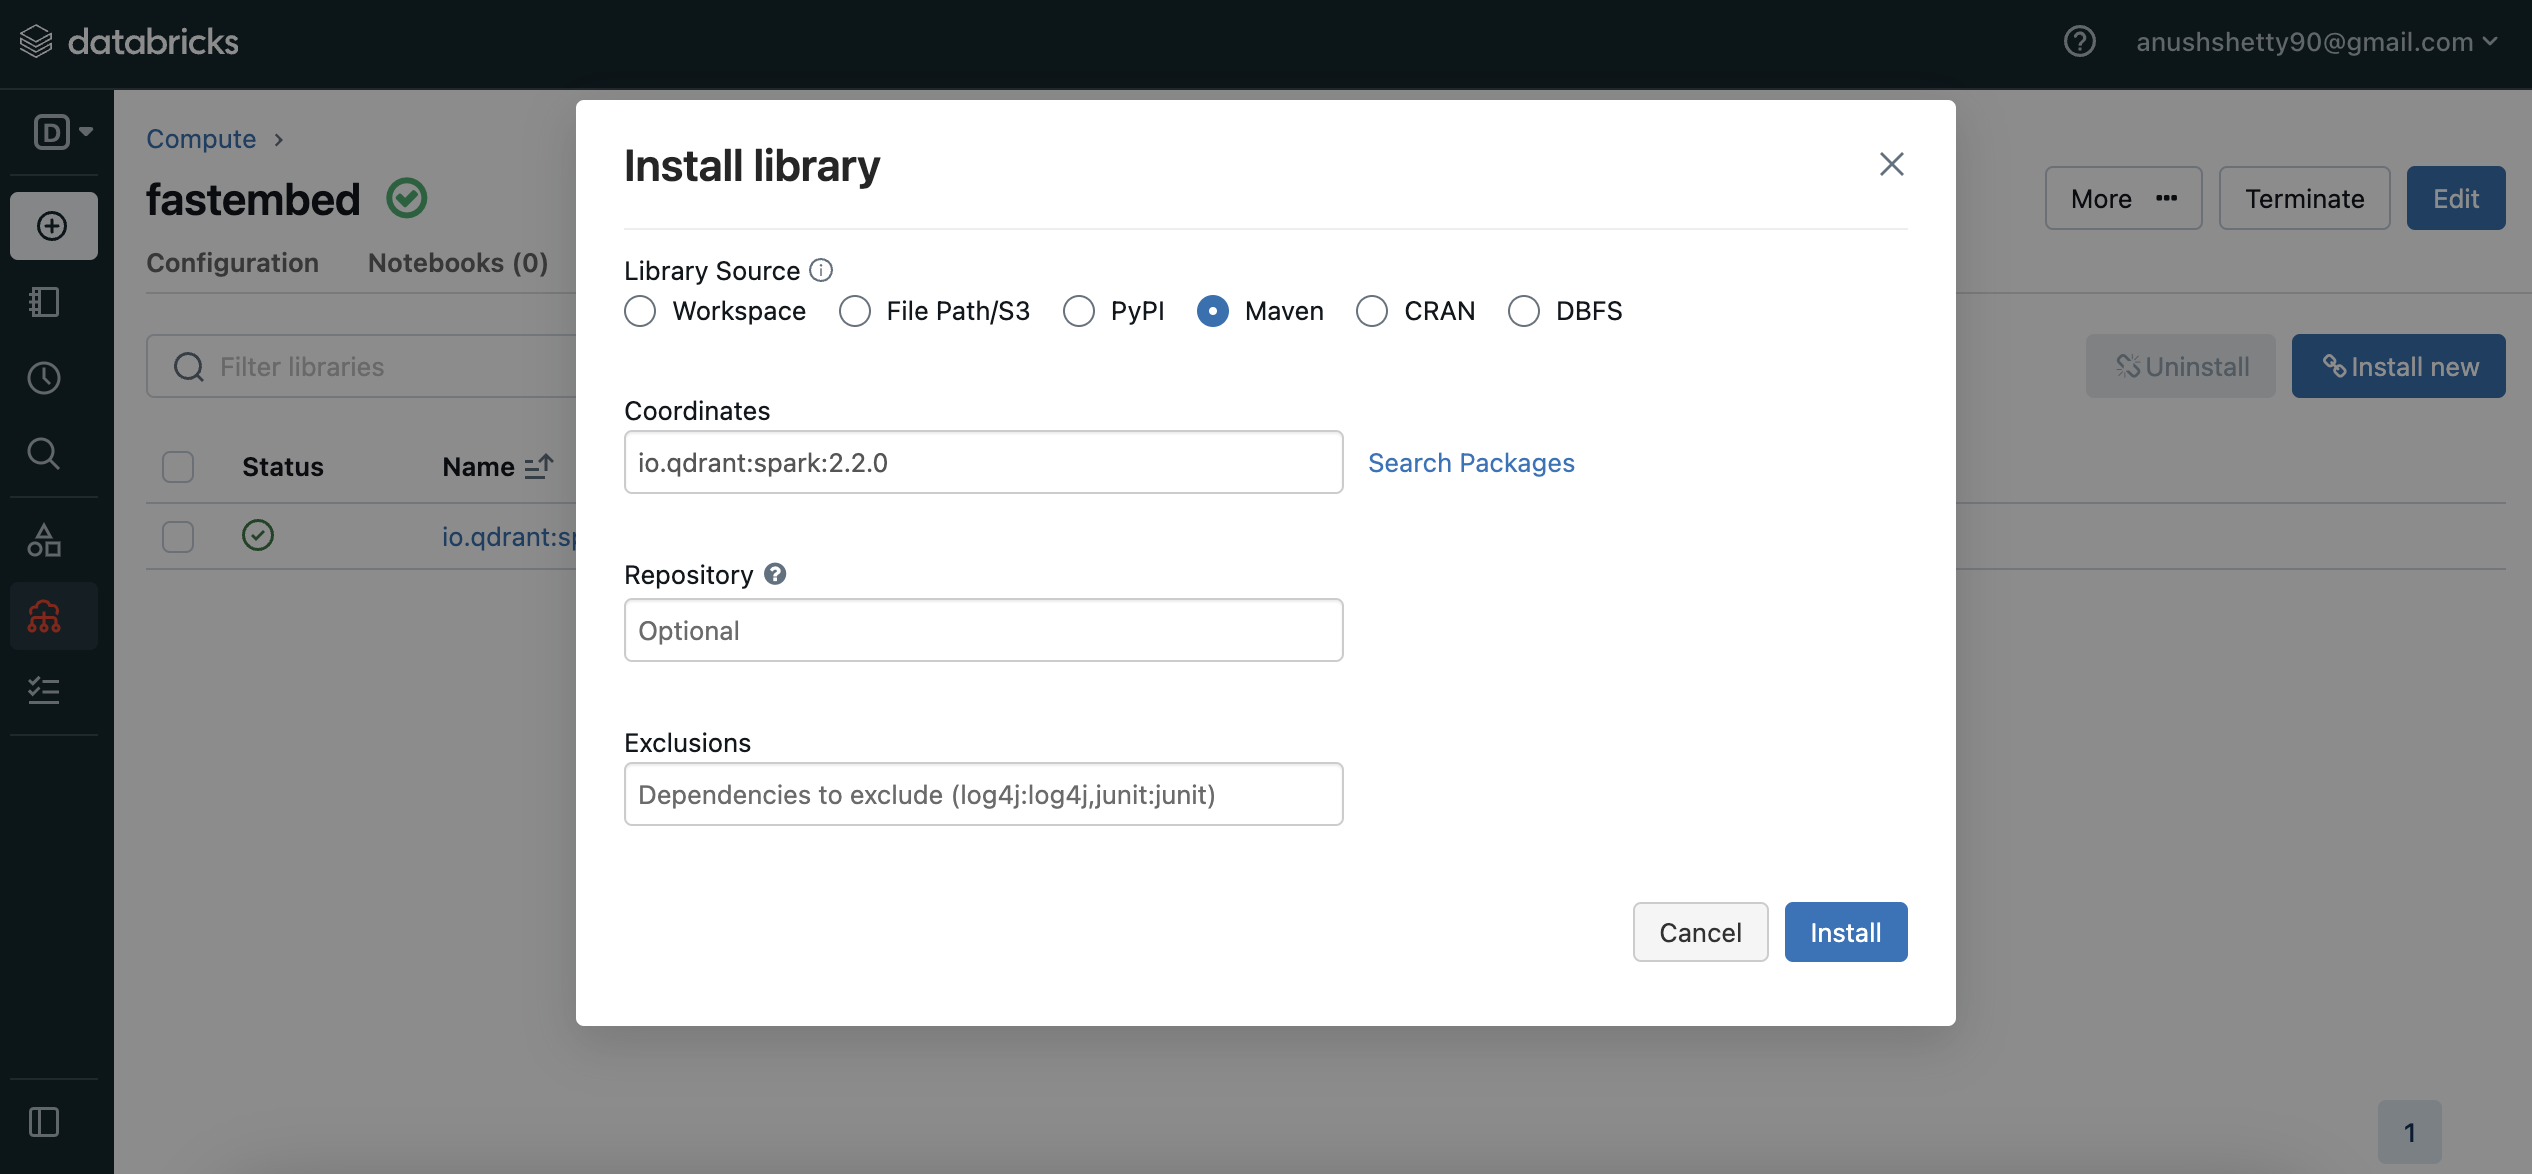
Create a new Databricks notebook on your cluster to begin working with your data and libraries.
Download a dataset
- Install the required dependencies:
%pip install fastembed datasets
- Download the dataset:
from datasets import load_dataset

dataset_name = "tasksource/med"
dataset = load_dataset(dataset_name, split="train")
# We'll use the first 100 entries from this dataset and exclude some unused columns.
dataset = dataset.select(range(100)).remove_columns(["gold_label", "genre"])
- Convert the dataset into a Spark dataframe:
dataset.to_parquet("/dbfs/pq.pq")
dataset_df = spark.read.parquet("file:/dbfs/pq.pq")
Vectorizing the data
In this section, we’ll be generating both dense and sparse vectors for our rows using FastEmbed. We’ll create a user-defined function (UDF) to handle this step.
Creating the vectorization function
from fastembed import TextEmbedding, SparseTextEmbedding

def vectorize(partition_data):
    # Initialize dense and sparse models
    dense_model = TextEmbedding(model_name="BAAI/bge-small-en-v1.5")
    sparse_model = SparseTextEmbedding(model_name="Qdrant/bm25")

    for row in partition_data:
        # Generate dense and sparse vectors
        dense_vector = next(dense_model.embed(row.sentence1))
        sparse_vector = next(sparse_model.embed(row.sentence2))

        yield [
            row.sentence1,  # 1st column: original text
            row.sentence2,  # 2nd column: original text
            dense_vector.tolist(),  # 3rd column: dense vector
            sparse_vector.indices.tolist(),  # 4th column: sparse vector indices
            sparse_vector.values.tolist(),  # 5th column: sparse vector values
        ]
We’re using the BAAI/bge-small-en-v1.5 model for dense embeddings and BM25 for sparse embeddings.
Applying the UDF on our dataframe
Next, let’s apply our vectorize UDF on our Spark dataframe to generate embeddings.
embeddings = dataset_df.rdd.mapPartitions(vectorize)
The mapPartitions() method returns a Resilient Distributed Dataset (RDD) which should then be converted back to a Spark dataframe.
Building the new Spark dataframe with the vectorized data
We’ll now create a new Spark dataframe (embeddings_df) with the vectorized data using the specified schema.
from pyspark.sql.types import StructType, StructField, StringType, ArrayType, FloatType, IntegerType

# Define the schema for the new dataframe
schema = StructType([
    StructField("sentence1", StringType()),
    StructField("sentence2", StringType()),
    StructField("dense_vector", ArrayType(FloatType())),
    StructField("sparse_vector_indices", ArrayType(IntegerType())),
    StructField("sparse_vector_values", ArrayType(FloatType()))
])

# Create the new dataframe with the vectorized data
embeddings_df = spark.createDataFrame(data=embeddings, schema=schema)
Uploading the data to Qdrant
Create a Qdrant collection:
- Follow the documentation to create a collection with the appropriate configurations. Here’s an example request to support both dense and sparse vectors:
PUT /collections/{collection_name}
{
  "vectors": {
    "dense": {
      "size": 384,
      "distance": "Cosine"
    }
  },
  "sparse_vectors": {
    "sparse": {}
  }
}
Upload the dataframe to Qdrant:
options = {
    "qdrant_url": "<QDRANT_GRPC_URL>",
    "api_key": "<QDRANT_API_KEY>",
    "collection_name": "<QDRANT_COLLECTION_NAME>",
    "vector_fields": "dense_vector",
    "vector_names": "dense",
    "sparse_vector_value_fields": "sparse_vector_values",
    "sparse_vector_index_fields": "sparse_vector_indices",
    "sparse_vector_names": "sparse",
    "schema": embeddings_df.schema.json(),
}

embeddings_df.write.format("io.qdrant.spark.Qdrant").options(**options).mode(
    "append"
).save()
Ensure to replace the placeholder values (<QDRANT_GRPC_URL>, <QDRANT_API_KEY>, <QDRANT_COLLECTION_NAME>) with your actual values. If the id_field option is not specified, Qdrant Spark connector generates random UUIDs for each point.
The command output you should see is similar to:
Command took 40.37 seconds -- by xxxxx90@xxxxxx.com at 4/17/2024, 12:13:28 PM on fastembed
Conclusion
That wraps up our tutorial! Feel free to explore more functionalities and experiments with different models, parameters, and features available in Databricks, Spark, and Qdrant.
Happy data engineering!