Question-Answering System for AI Customer Support
| Time: 120 min | Level: Advanced |
|---|
Maintaining top-notch customer service is vital to business success. As your operation expands, so does the influx of customer queries. Many of these queries are repetitive, making automation a time-saving solution. Your support team’s expertise is typically kept private, but you can still use AI to automate responses securely.
In this tutorial we will setup a private AI service that answers customer support queries with high accuracy and effectiveness. By leveraging Cohere’s powerful models (deployed to AWS) with Qdrant Hybrid Cloud, you can create a fully private customer support system. Data synchronization, facilitated by Airbyte, will complete the setup.

System design
The history of past interactions with your customers is not a static dataset. It is constantly evolving, as new questions are coming in. You probably have a ticketing system that stores all the interactions, or use a different way to communicate with your customers. No matter what is the communication channel, you need to bring the correct answers to the selected Large Language Model, and have an established way to do it in a continuous manner. Thus, we will build an ingestion pipeline and then a Retrieval Augmented Generation application that will use the data.
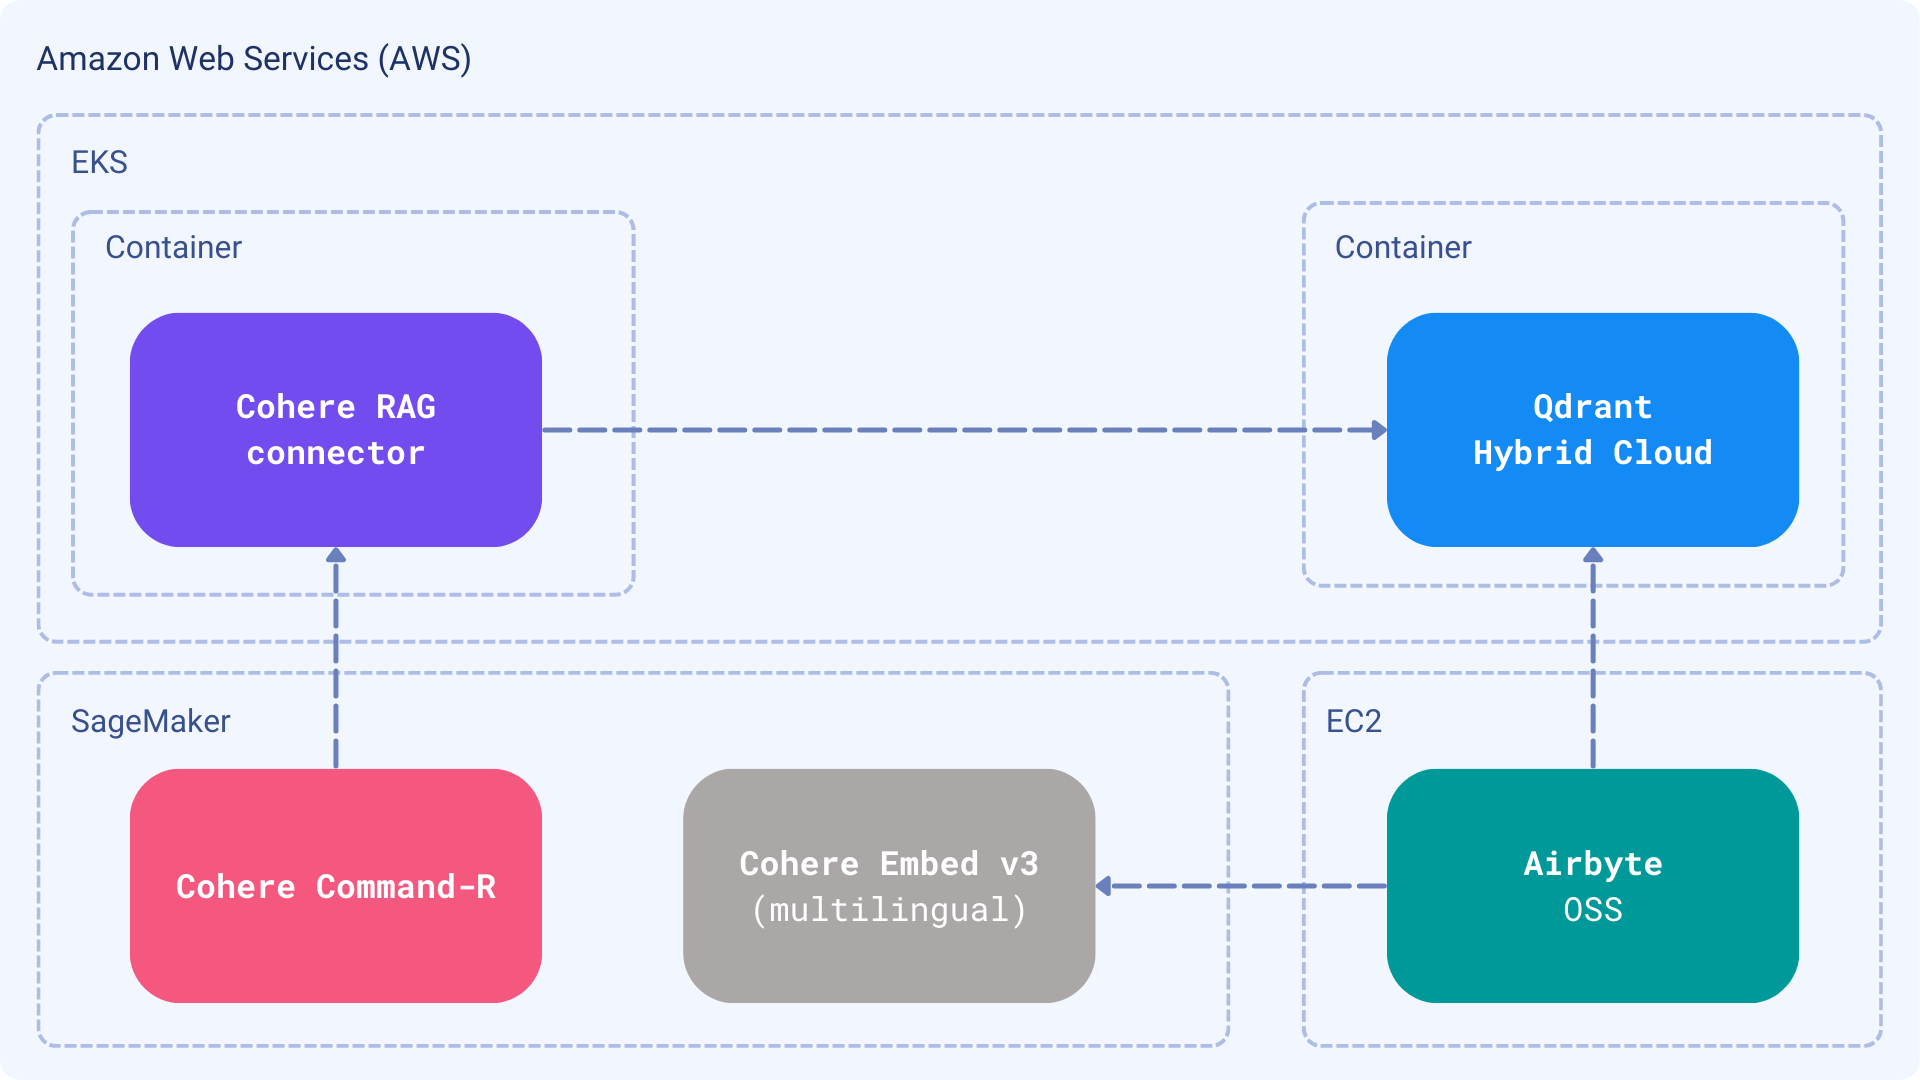
- Dataset: a set of Frequently Asked Questions from Qdrant users as an incrementally updated Excel sheet
- Embedding model: Cohere
embed-multilingual-v3.0, to support different languages with the same pipeline - Knowledge base: Qdrant, running in Hybrid Cloud mode
- Ingestion pipeline: Airbyte, loading the data into Qdrant
- Large Language Model: Cohere Command-R
- RAG: Cohere RAG using our knowledge base through a custom connector
All the selected components are compatible with the AWS infrastructure. Thanks to Cohere models’ availability, you can build a fully private customer support system completely isolates data within your infrastructure. Also, if you have AWS credits, you can now use them without spending additional money on the models or semantic search layer.
Data ingestion
Building a RAG starts with a well-curated dataset. In your specific case you may prefer loading the data directly from a ticketing system, such as Zendesk Support, Freshdesk, or maybe integrate it with a shared inbox. However, in case of customer questions quality over quantity is the key. There should be a conscious decision on what data to include in the knowledge base, so we do not confuse the model with possibly irrelevant information. We’ll assume there is an Excel sheet available over HTTP/FTP that Airbyte can access and load into Qdrant in an incremental manner.
Cohere <> Qdrant Connector for RAG
Cohere RAG relies on connectors which brings additional context to the model. The connector is a web service that implements a specific interface, and exposes its data through HTTP API. With that setup, the Large Language Model becomes responsible for communicating with the connectors, so building a prompt with the context is not needed anymore.
Answering bot
Finally, we want to automate the responses and send them automatically when we are sure that the model is confident enough. Again, the way such an application should be created strongly depends on the system you are using within the customer support team. If it exposes a way to set up a webhook whenever a new question is coming in, you can create a web service and use it to automate the responses. In general, our bot should be created specifically for the platform you use, so we’ll just cover the general idea here and build a simple CLI tool.
Prerequisites
Cohere models on AWS
One of the possible ways to deploy Cohere models on AWS is to use AWS SageMaker. Cohere’s website has a detailed guide on how to deploy the models in that way, so you can follow the steps described there to set up your own instance.
Qdrant Hybrid Cloud on AWS
Our documentation covers the deployment of Qdrant on AWS as a Hybrid Cloud Environment, so you can follow the steps described there to set up your own instance. The deployment process is quite straightforward, and you can have your Qdrant cluster up and running in a few minutes.
Once you perform all the steps, your Qdrant cluster should be running on a specific URL. You will need this URL and the API key to interact with Qdrant, so let’s store them both in the environment variables:
export QDRANT_URL="https://qdrant.example.com"
export QDRANT_API_KEY="your-api-key"
import os

os.environ["QDRANT_URL"] = "https://qdrant.example.com"
os.environ["QDRANT_API_KEY"] = "your-api-key"
Airbyte Open Source
Airbyte is an open-source data integration platform that helps you replicate your data in your warehouses, lakes, and databases. You can install it on your infrastructure and use it to load the data into Qdrant. The installation process is described in the official documentation. Please follow the instructions to set up your own instance.
Setting up the connection
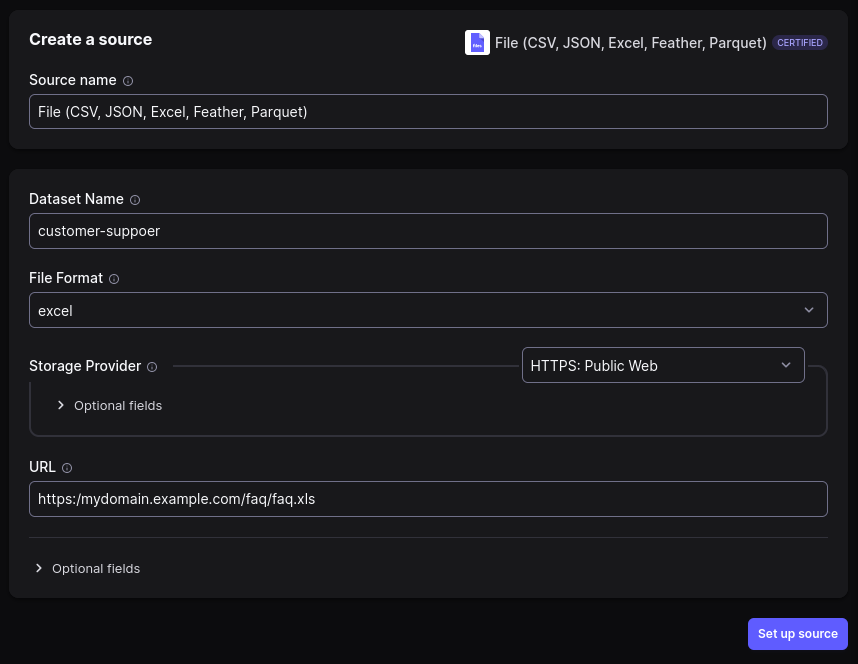
Once you have an Airbyte up and running, you can configure the connection to load the data from the respective source into Qdrant. The configuration will require setting up the source and destination connectors. In this tutorial we will use the following connectors:
Airbyte UI will guide you through the process of setting up the source and destination and connecting them. Here is how the configuration of the source might look like:

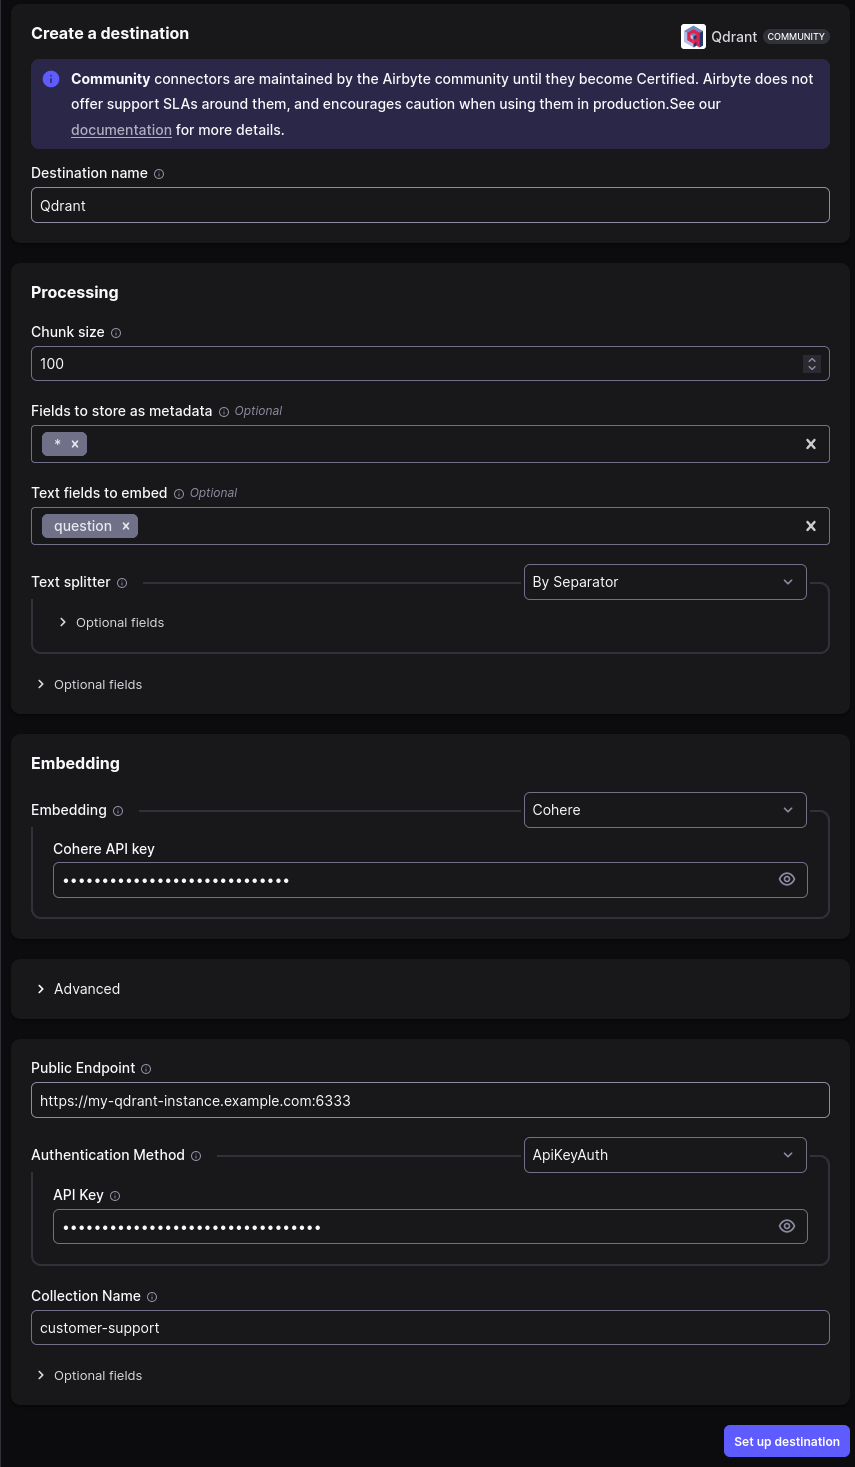
Qdrant is our target destination, so we need to set up the connection to it. We need to specify which fields should be included to generate the embeddings. In our case it makes complete sense to embed just the questions, as we are going to look for similar questions asked in the past and provide the answers.

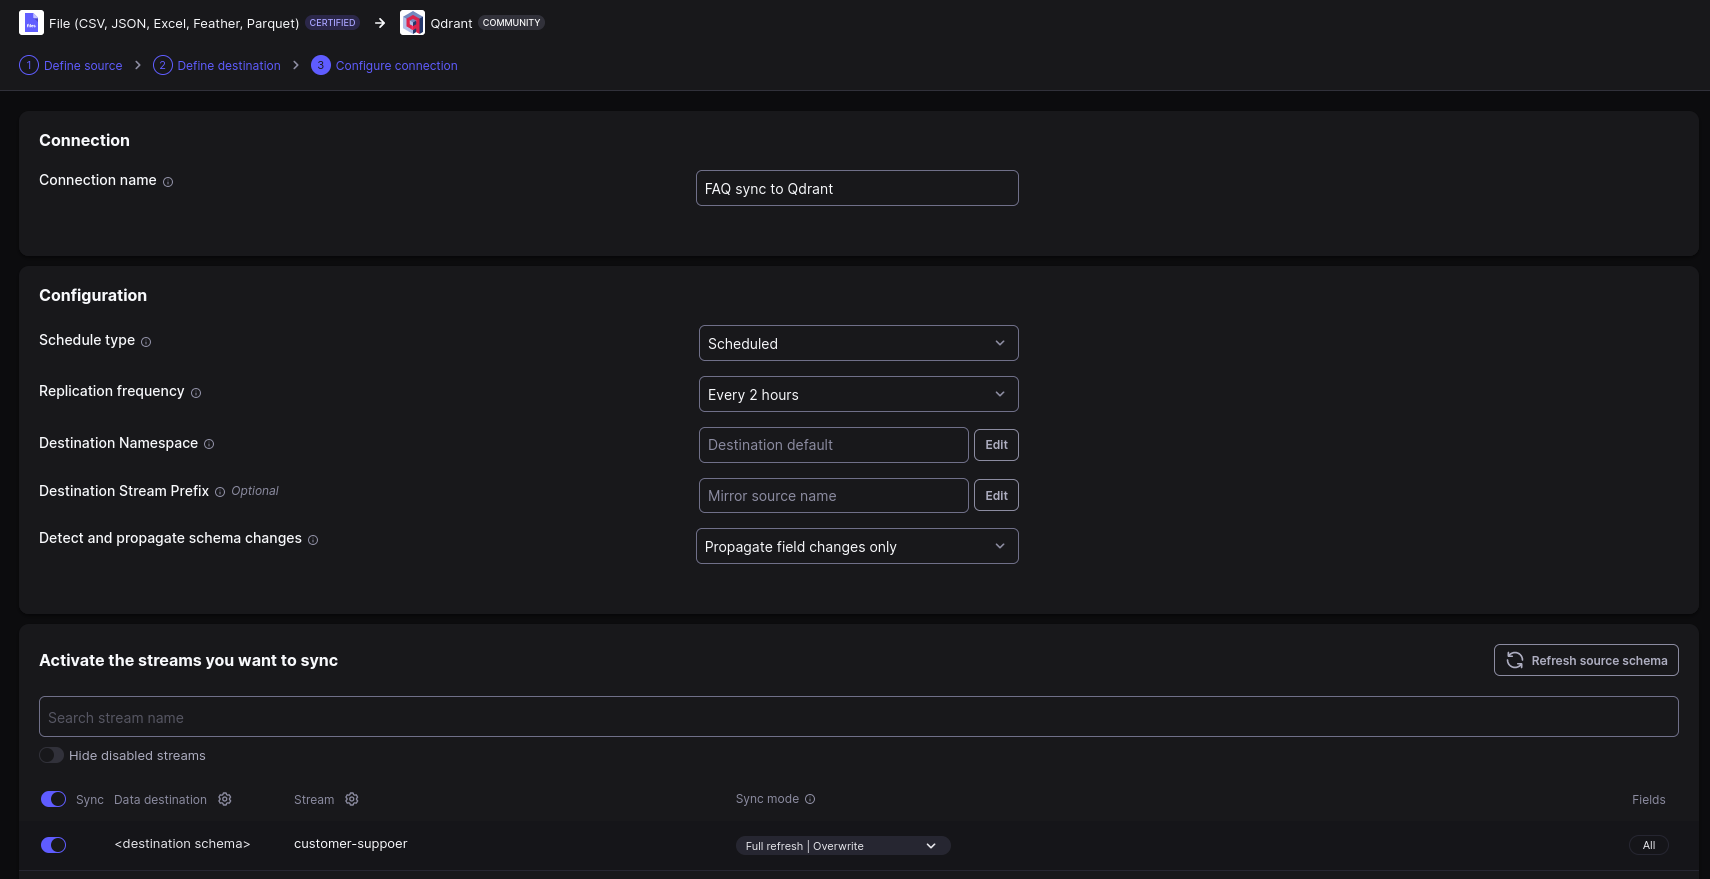
Once we have the destination set up, we can finally configure a connection. The connection will define the schedule of the data synchronization.

Airbyte should now be ready to accept any data updates from the source and load them into Qdrant. You can monitor the progress of the synchronization in the UI.
RAG connector
One of our previous tutorials, guides you step-by-step on implementing custom connector for Cohere RAG with Cohere Embed v3 and Qdrant. You can just point it to use your Hybrid Cloud Qdrant instance running on AWS. Created connector might be deployed to Amazon Web Services in various ways, even in a Serverless manner using AWS Lambda.
In general, RAG connector has to expose a single endpoint that will accept POST requests with query parameter and
return the matching documents as JSON document with a specific structure. Our FastAPI implementation created in the
related tutorial is a perfect fit for this task. The only difference is that you
should point it to the Cohere models and Qdrant running on AWS infrastructure.
Our connector is a lightweight web service that exposes a single endpoint and glues the Cohere embedding model with our Qdrant Hybrid Cloud instance. Thus, it perfectly fits the serverless architecture, requiring no additional infrastructure to run.
You can also run the connector as another service within your Kubernetes cluster running on AWS (EKS), or by launching an EC2 compute instance. This step is dependent on the way you deploy your other services, so we’ll leave it to you to decide how to run the connector.
Eventually, the web service should be available under a specific URL, and it’s a good practice to store it in the environment variable, so the other services can easily access it.
export RAG_CONNECTOR_URL="https://rag-connector.example.com/search"
os.environ["RAG_CONNECTOR_URL"] = "https://rag-connector.example.com/search"
Customer interface
At this part we have all the data loaded into Qdrant, and the RAG connector is ready to serve the relevant context. The last missing piece is the customer interface, that will call the Command model to create the answer. Such a system should be built specifically for the platform you use and integrated into its workflow, but we will build the strong foundation for it and show how to use it in a simple CLI tool.
Our application does not have to connect to Qdrant anymore, as the model will connect to the RAG connector directly.
First of all, we have to create a connection to Cohere services through the Cohere SDK.
import cohere

# Create a Cohere client pointing to the AWS instance
cohere_client = cohere.Client(...)
Next, our connector should be registered. Please make sure to do it once, and store the id of the connector in the environment variable or in any other way that will be accessible to the application.
import os

connector_response = cohere_client.connectors.create(
    name="customer-support",
    url=os.environ["RAG_CONNECTOR_URL"],
)

# The id returned by the API should be stored for future use
connector_id = connector_response.connector.id
Finally, we can create a prompt and get the answer from the model. Additionally, we define which of the connectors should be used to provide the context, as we may have multiple connectors and want to use specific ones, depending on some conditions. Let’s start with asking a question.
query = "Why Qdrant does not return my vectors?"
Now we can send the query to the model, get the response, and possibly send it back to the customer.
response = cohere_client.chat(
    message=query,
    connectors=[
        cohere.ChatConnector(id=connector_id),
    ],
    model="command-r",
)

print(response.text)
The output should be the answer to the question, generated by the model, for example:
Qdrant is set up by default to minimize network traffic and therefore doesn’t return vectors in search results. However, you can make Qdrant return your vectors by setting the ‘with_vector’ parameter of the Search/Scroll function to true.
Customer support should not be fully automated, as some completely new issues might require human intervention. We should play with prompt engineering and expect the model to provide the answer with a certain confidence level. If the confidence is too low, we should not send the answer automatically but present it to the support team for review.
Wrapping up
This tutorial shows how to build a fully private customer support system using Cohere models, Qdrant Hybrid Cloud, and Airbyte, which runs on AWS infrastructure. You can ensure your data does not leave your premises and focus on providing the best customer support experience without bothering your team with repetitive tasks.
