Apache Spark
Spark is a distributed computing framework designed for big data processing and analytics. The Qdrant-Spark connector enables Qdrant to be a storage destination in Spark.
Installation
To integrate the connector into your Spark environment, get the JAR file from one of the sources listed below.
- GitHub Releases
The packaged jar file with all the required dependencies can be found here.
- Building from Source
To build the jar from source, you need JDK@8 and Maven installed. Once the requirements have been satisfied, run the following command in the project root.
mvn package -DskipTests
The JAR file will be written into the target directory by default.
- Maven Central
Find the project on Maven Central here.
Usage
Creating a Spark session with Qdrant support
from pyspark.sql import SparkSession

spark = SparkSession.builder.config(
        "spark.jars",
        "path/to/file/spark-VERSION.jar",  # Specify the path to the downloaded JAR file
    )
    .master("local[*]")
    .appName("qdrant")
    .getOrCreate()
import org.apache.spark.sql.SparkSession

val spark = SparkSession.builder
  .config("spark.jars", "path/to/file/spark-VERSION.jar") // Specify the path to the downloaded JAR file
  .master("local[*]")
  .appName("qdrant")
  .getOrCreate()
import org.apache.spark.sql.SparkSession;

public class QdrantSparkJavaExample {
    public static void main(String[] args) {
        SparkSession spark = SparkSession.builder()
                .config("spark.jars", "path/to/file/spark-VERSION.jar") // Specify the path to the downloaded JAR file
                .master("local[*]")
                .appName("qdrant")
                .getOrCreate();
    }
}
Loading data
Before loading the data using this connector, a collection has to be created in advance with the appropriate vector dimensions and configurations.
The connector supports ingesting multiple named/unnamed, dense/sparse vectors.
Click each to expand.
Unnamed/Default vector
  <pyspark.sql.DataFrame>
   .write
   .format("io.qdrant.spark.Qdrant")
   .option("qdrant_url", <QDRANT_GRPC_URL>)
   .option("collection_name", <QDRANT_COLLECTION_NAME>)
   .option("embedding_field", <EMBEDDING_FIELD_NAME>)  # Expected to be a field of type ArrayType(FloatType)
   .option("schema", <pyspark.sql.DataFrame>.schema.json())
   .mode("append")
   .save()
Named vector
  <pyspark.sql.DataFrame>
   .write
   .format("io.qdrant.spark.Qdrant")
   .option("qdrant_url", <QDRANT_GRPC_URL>)
   .option("collection_name", <QDRANT_COLLECTION_NAME>)
   .option("embedding_field", <EMBEDDING_FIELD_NAME>)  # Expected to be a field of type ArrayType(FloatType)
   .option("vector_name", <VECTOR_NAME>)
   .option("schema", <pyspark.sql.DataFrame>.schema.json())
   .mode("append")
   .save()
NOTE
The
embedding_fieldandvector_nameoptions are maintained for backward compatibility. It is recommended to usevector_fieldsandvector_namesfor named vectors as shown below.
Multiple named vectors
  <pyspark.sql.DataFrame>
   .write
   .format("io.qdrant.spark.Qdrant")
   .option("qdrant_url", "<QDRANT_GRPC_URL>")
   .option("collection_name", "<QDRANT_COLLECTION_NAME>")
   .option("vector_fields", "<COLUMN_NAME>,<ANOTHER_COLUMN_NAME>")
   .option("vector_names", "<VECTOR_NAME>,<ANOTHER_VECTOR_NAME>")
   .option("schema", <pyspark.sql.DataFrame>.schema.json())
   .mode("append")
   .save()
Sparse vectors
  <pyspark.sql.DataFrame>
   .write
   .format("io.qdrant.spark.Qdrant")
   .option("qdrant_url", "<QDRANT_GRPC_URL>")
   .option("collection_name", "<QDRANT_COLLECTION_NAME>")
   .option("sparse_vector_value_fields", "<COLUMN_NAME>")
   .option("sparse_vector_index_fields", "<COLUMN_NAME>")
   .option("sparse_vector_names", "<SPARSE_VECTOR_NAME>")
   .option("schema", <pyspark.sql.DataFrame>.schema.json())
   .mode("append")
   .save()
Multiple sparse vectors
  <pyspark.sql.DataFrame>
   .write
   .format("io.qdrant.spark.Qdrant")
   .option("qdrant_url", "<QDRANT_GRPC_URL>")
   .option("collection_name", "<QDRANT_COLLECTION_NAME>")
   .option("sparse_vector_value_fields", "<COLUMN_NAME>,<ANOTHER_COLUMN_NAME>")
   .option("sparse_vector_index_fields", "<COLUMN_NAME>,<ANOTHER_COLUMN_NAME>")
   .option("sparse_vector_names", "<SPARSE_VECTOR_NAME>,<ANOTHER_SPARSE_VECTOR_NAME>")
   .option("schema", <pyspark.sql.DataFrame>.schema.json())
   .mode("append")
   .save()
Combination of named dense and sparse vectors
  <pyspark.sql.DataFrame>
   .write
   .format("io.qdrant.spark.Qdrant")
   .option("qdrant_url", "<QDRANT_GRPC_URL>")
   .option("collection_name", "<QDRANT_COLLECTION_NAME>")
   .option("vector_fields", "<COLUMN_NAME>,<ANOTHER_COLUMN_NAME>")
   .option("vector_names", "<VECTOR_NAME>,<ANOTHER_VECTOR_NAME>")
   .option("sparse_vector_value_fields", "<COLUMN_NAME>,<ANOTHER_COLUMN_NAME>")
   .option("sparse_vector_index_fields", "<COLUMN_NAME>,<ANOTHER_COLUMN_NAME>")
   .option("sparse_vector_names", "<SPARSE_VECTOR_NAME>,<ANOTHER_SPARSE_VECTOR_NAME>")
   .option("schema", <pyspark.sql.DataFrame>.schema.json())
   .mode("append")
   .save()
Multi-vectors
  <pyspark.sql.DataFrame>
   .write
   .format("io.qdrant.spark.Qdrant")
   .option("qdrant_url", "<QDRANT_GRPC_URL>")
   .option("collection_name", "<QDRANT_COLLECTION_NAME>")
   .option("multi_vector_fields", "<COLUMN_NAME>")
   .option("multi_vector_names", "<MULTI_VECTOR_NAME>")
   .option("schema", <pyspark.sql.DataFrame>.schema.json())
   .mode("append")
   .save()
Multiple Multi-vectors
  <pyspark.sql.DataFrame>
   .write
   .format("io.qdrant.spark.Qdrant")
   .option("qdrant_url", "<QDRANT_GRPC_URL>")
   .option("collection_name", "<QDRANT_COLLECTION_NAME>")
   .option("multi_vector_fields", "<COLUMN_NAME>,<ANOTHER_COLUMN_NAME>")
   .option("multi_vector_names", "<MULTI_VECTOR_NAME>,<ANOTHER_MULTI_VECTOR_NAME>")
   .option("schema", <pyspark.sql.DataFrame>.schema.json())
   .mode("append")
   .save()
No vectors - Entire dataframe is stored as payload
  <pyspark.sql.DataFrame>
   .write
   .format("io.qdrant.spark.Qdrant")
   .option("qdrant_url", "<QDRANT_GRPC_URL>")
   .option("collection_name", "<QDRANT_COLLECTION_NAME>")
   .option("schema", <pyspark.sql.DataFrame>.schema.json())
   .mode("append")
   .save()
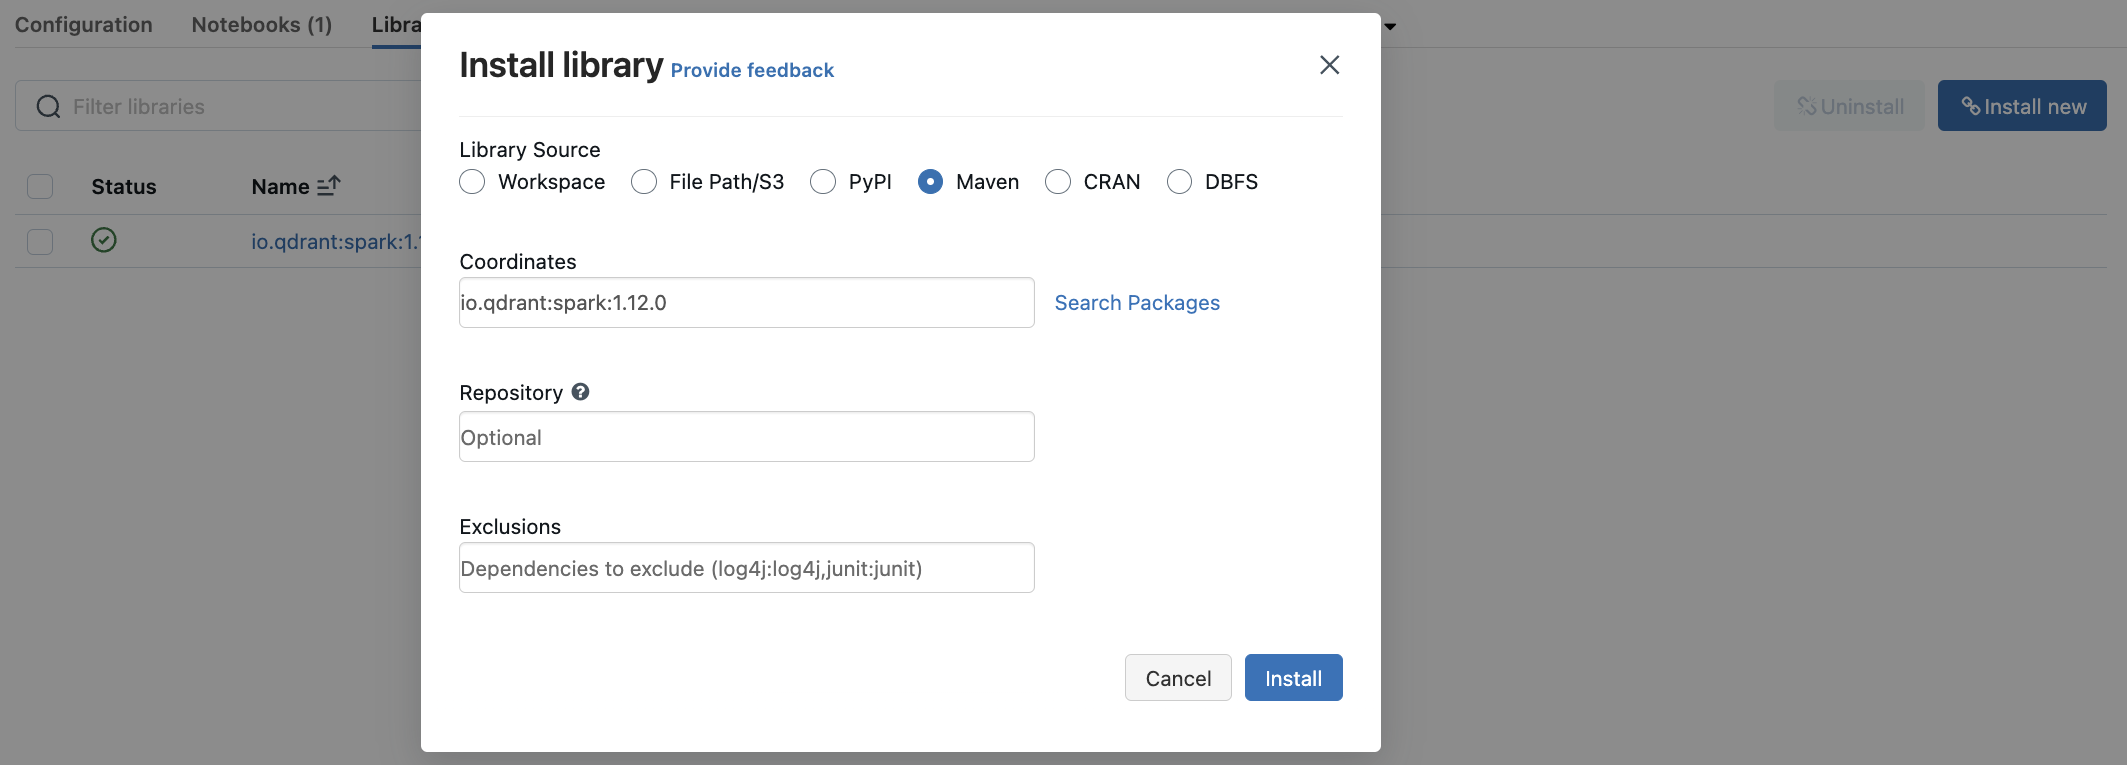
Databricks
You can use the qdrant-spark connector as a library in Databricks.
- Go to the
Librariessection in your Databricks cluster dashboard. - Select
Install Newto open the library installation modal. - Search for
io.qdrant:spark:VERSIONin the Maven packages and clickInstall.
Datatype support
The appropriate Spark data types are mapped to the Qdrant payload based on the provided schema.
Options and Spark types
| Option | Description | Column DataType | Required |
|---|---|---|---|
qdrant_url | gRPC URL of the Qdrant instance. Eg: http://localhost:6334 | - | ✅ |
collection_name | Name of the collection to write data into | - | ✅ |
schema | JSON string of the dataframe schema | - | ✅ |
embedding_field | Name of the column holding the embeddings (Deprecated - Use vector_fields instead) | ArrayType(FloatType) | ❌ |
id_field | Name of the column holding the point IDs. Default: Random UUID | StringType or IntegerType | ❌ |
batch_size | Max size of the upload batch. Default: 64 | - | ❌ |
retries | Number of upload retries. Default: 3 | - | ❌ |
api_key | Qdrant API key for authentication | - | ❌ |
vector_name | Name of the vector in the collection. | - | ❌ |
vector_fields | Comma-separated names of columns holding the vectors. | ArrayType(FloatType) | ❌ |
vector_names | Comma-separated names of vectors in the collection. | - | ❌ |
sparse_vector_index_fields | Comma-separated names of columns holding the sparse vector indices. | ArrayType(IntegerType) | ❌ |
sparse_vector_value_fields | Comma-separated names of columns holding the sparse vector values. | ArrayType(FloatType) | ❌ |
sparse_vector_names | Comma-separated names of the sparse vectors in the collection. | - | ❌ |
multi_vector_fields | Comma-separated names of columns holding the multi-vector values. | ArrayType(ArrayType(FloatType)) | ❌ |
multi_vector_names | Comma-separated names of the multi-vectors in the collection. | - | ❌ |
shard_key_selector | Comma-separated names of custom shard keys to use during upsert. | - | ❌ |
wait | Wait for each batch upsert to complete. true or false. Defaults to true. | - | ❌ |
For more information, be sure to check out the Qdrant-Spark GitHub repository. The Apache Spark guide is available here. Happy data processing!