Qdrant Agentic RAG System with CrewAI
| Time: 45 min | Level: Beginner | Output: GitHub |
|---|
By combining the power of Qdrant for vector search and CrewAI for orchestrating modular agents, you can build systems that don’t just answer questions but analyze, interpret, and act.
Traditional RAG systems focus on fetching data and generating responses, but they lack the ability to reason deeply or handle multi-step processes.
In this tutorial, we’ll walk you through building an Agentic RAG system step by step. By the end, you’ll have a working framework for storing data in a Qdrant Vector Database and extracting insights using CrewAI agents in conjunction with Vector Search over your data.
We already built this app for you. Clone this repository and follow along with the tutorial.
What You’ll Build
In this hands-on tutorial, we’ll create a system that:
- Uses Qdrant to store and retrieve meeting transcripts as vector embeddings
- Leverages CrewAI agents to analyze and summarize meeting data
- Presents insights in a simple Streamlit interface for easy interaction
This project demonstrates how to build a Vector Search powered Agentic workflow to extract insights from meeting recordings. By combining Qdrant’s vector search capabilities with CrewAI agents, users can search through and analyze their own meeting content.
The application first converts the meeting transcript into vector embeddings and stores them in a Qdrant vector database. It then uses CrewAI agents to query the vector database and extract insights from the meeting content. Finally, it uses Anthropic Claude to generate natural language responses to user queries based on the extracted insights from the vector database.
How Does It Work?
When you interact with the system, here’s what happens behind the scenes:
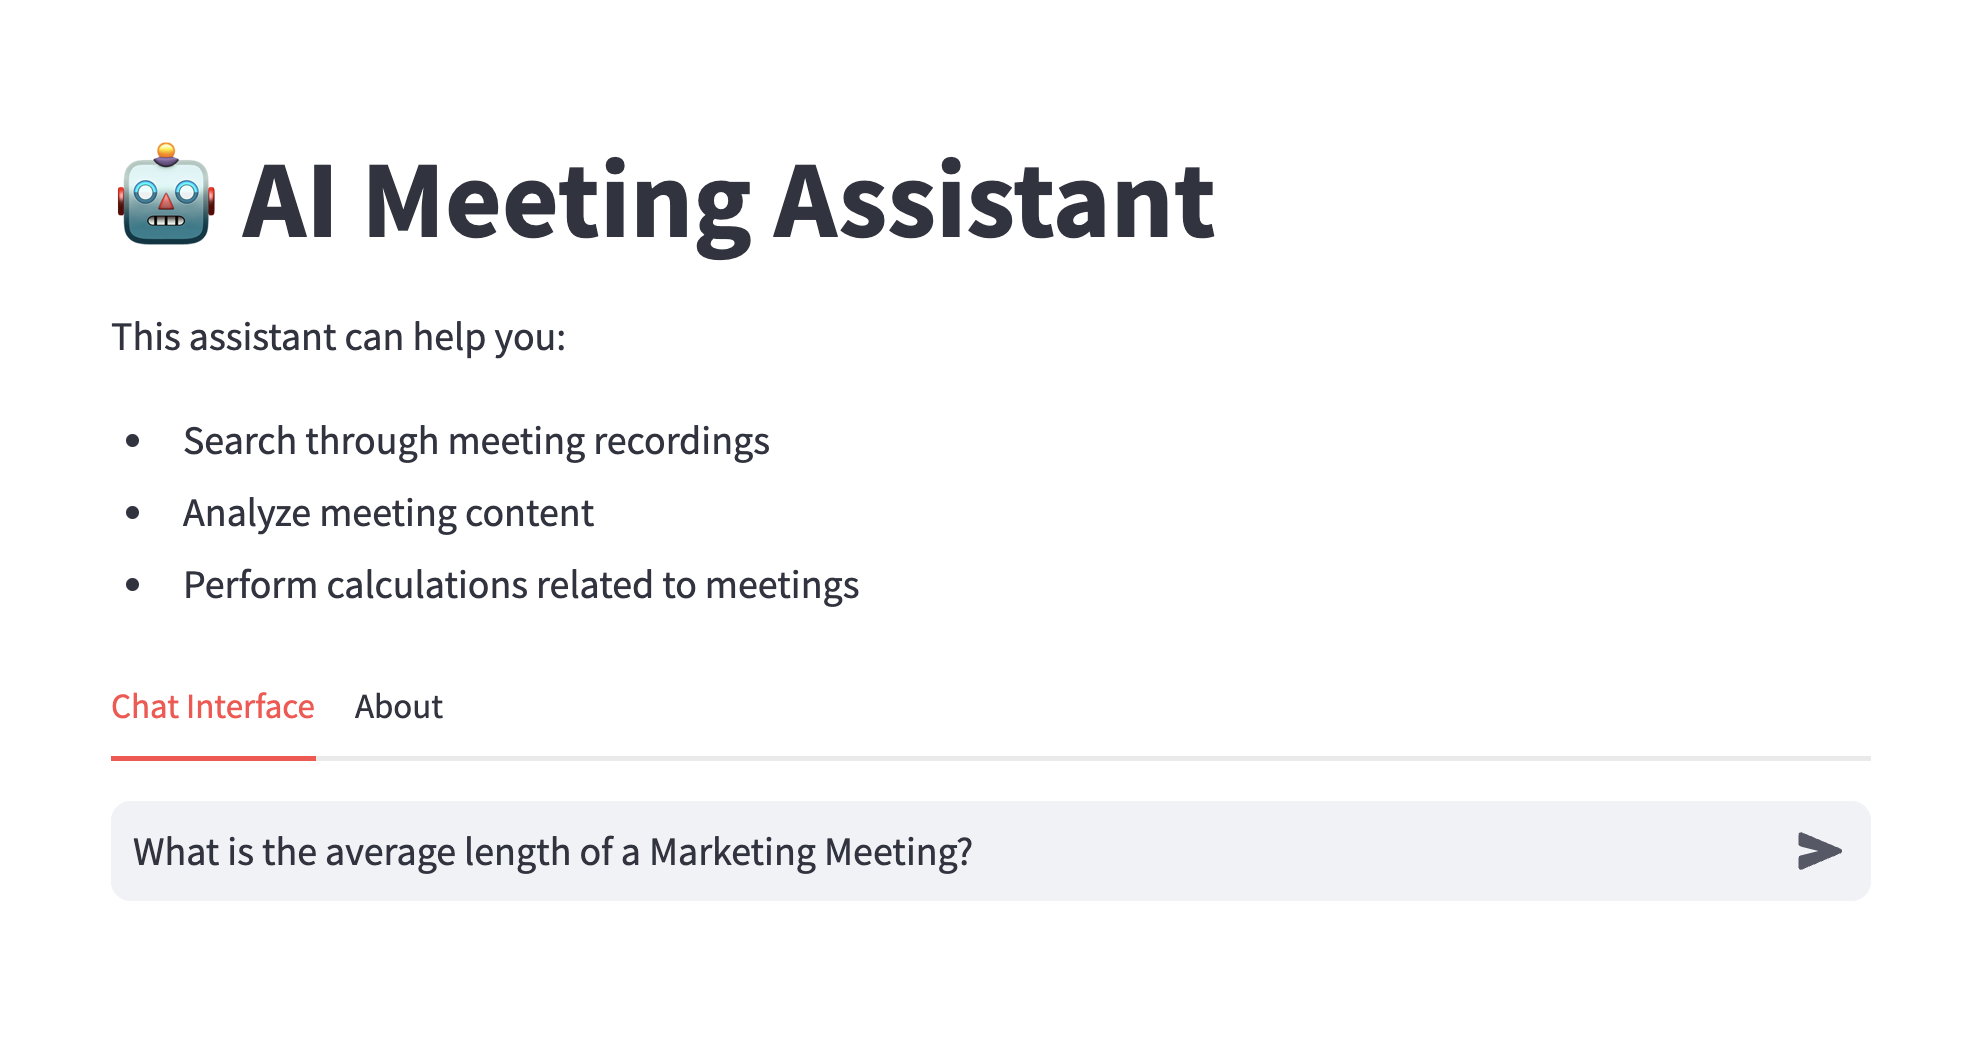
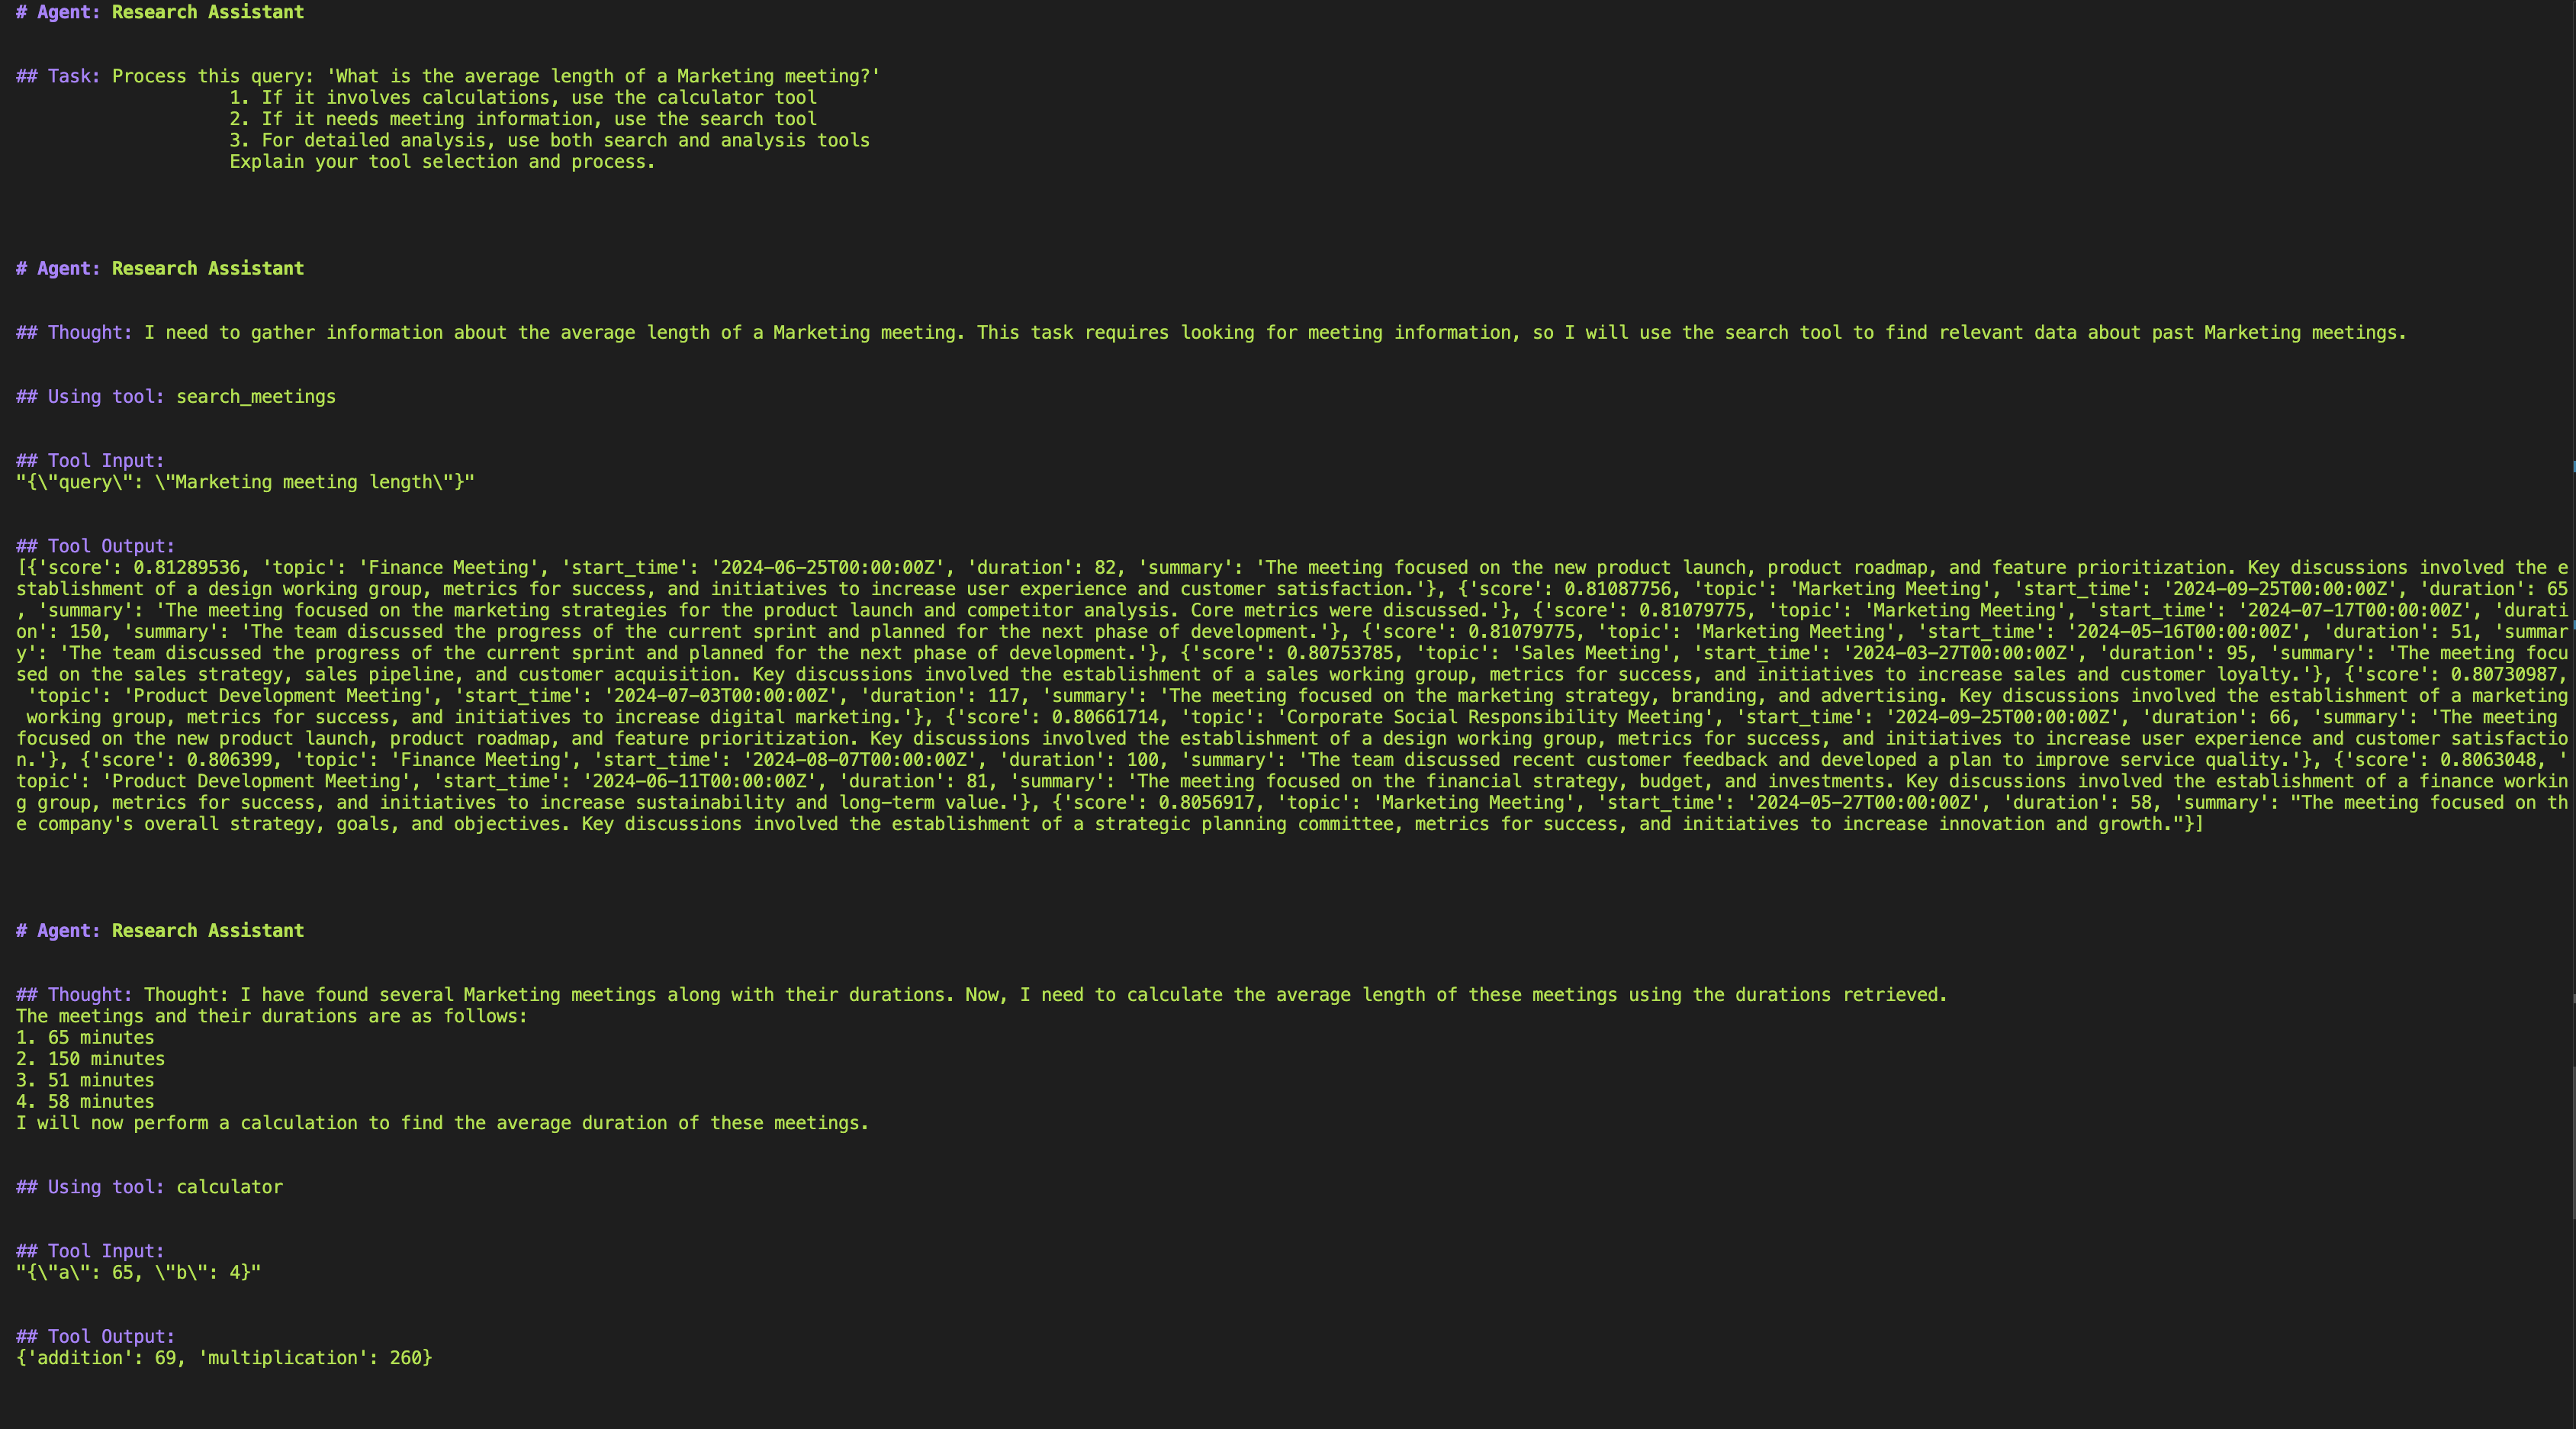
First the user submits a query to the system. In this example, we want to find out the average length of Marketing meetings. Since one of the data points from the meetings is the duration of the meeting, the agent can calculate the average duration of the meetings by averaging the duration of all meetings with the keyword “Marketing” in the topic or content.

Next, the agent used the search_meetings tool to search the Qdrant vector database for the most semantically similar meeting points. We asked about Marketing meetings, so the agent searched the database with the search meeting tool for all meetings with the keyword “Marketing” in the topic or content.

Next, the agent used the calculator tool to find the average duration of the meetings.

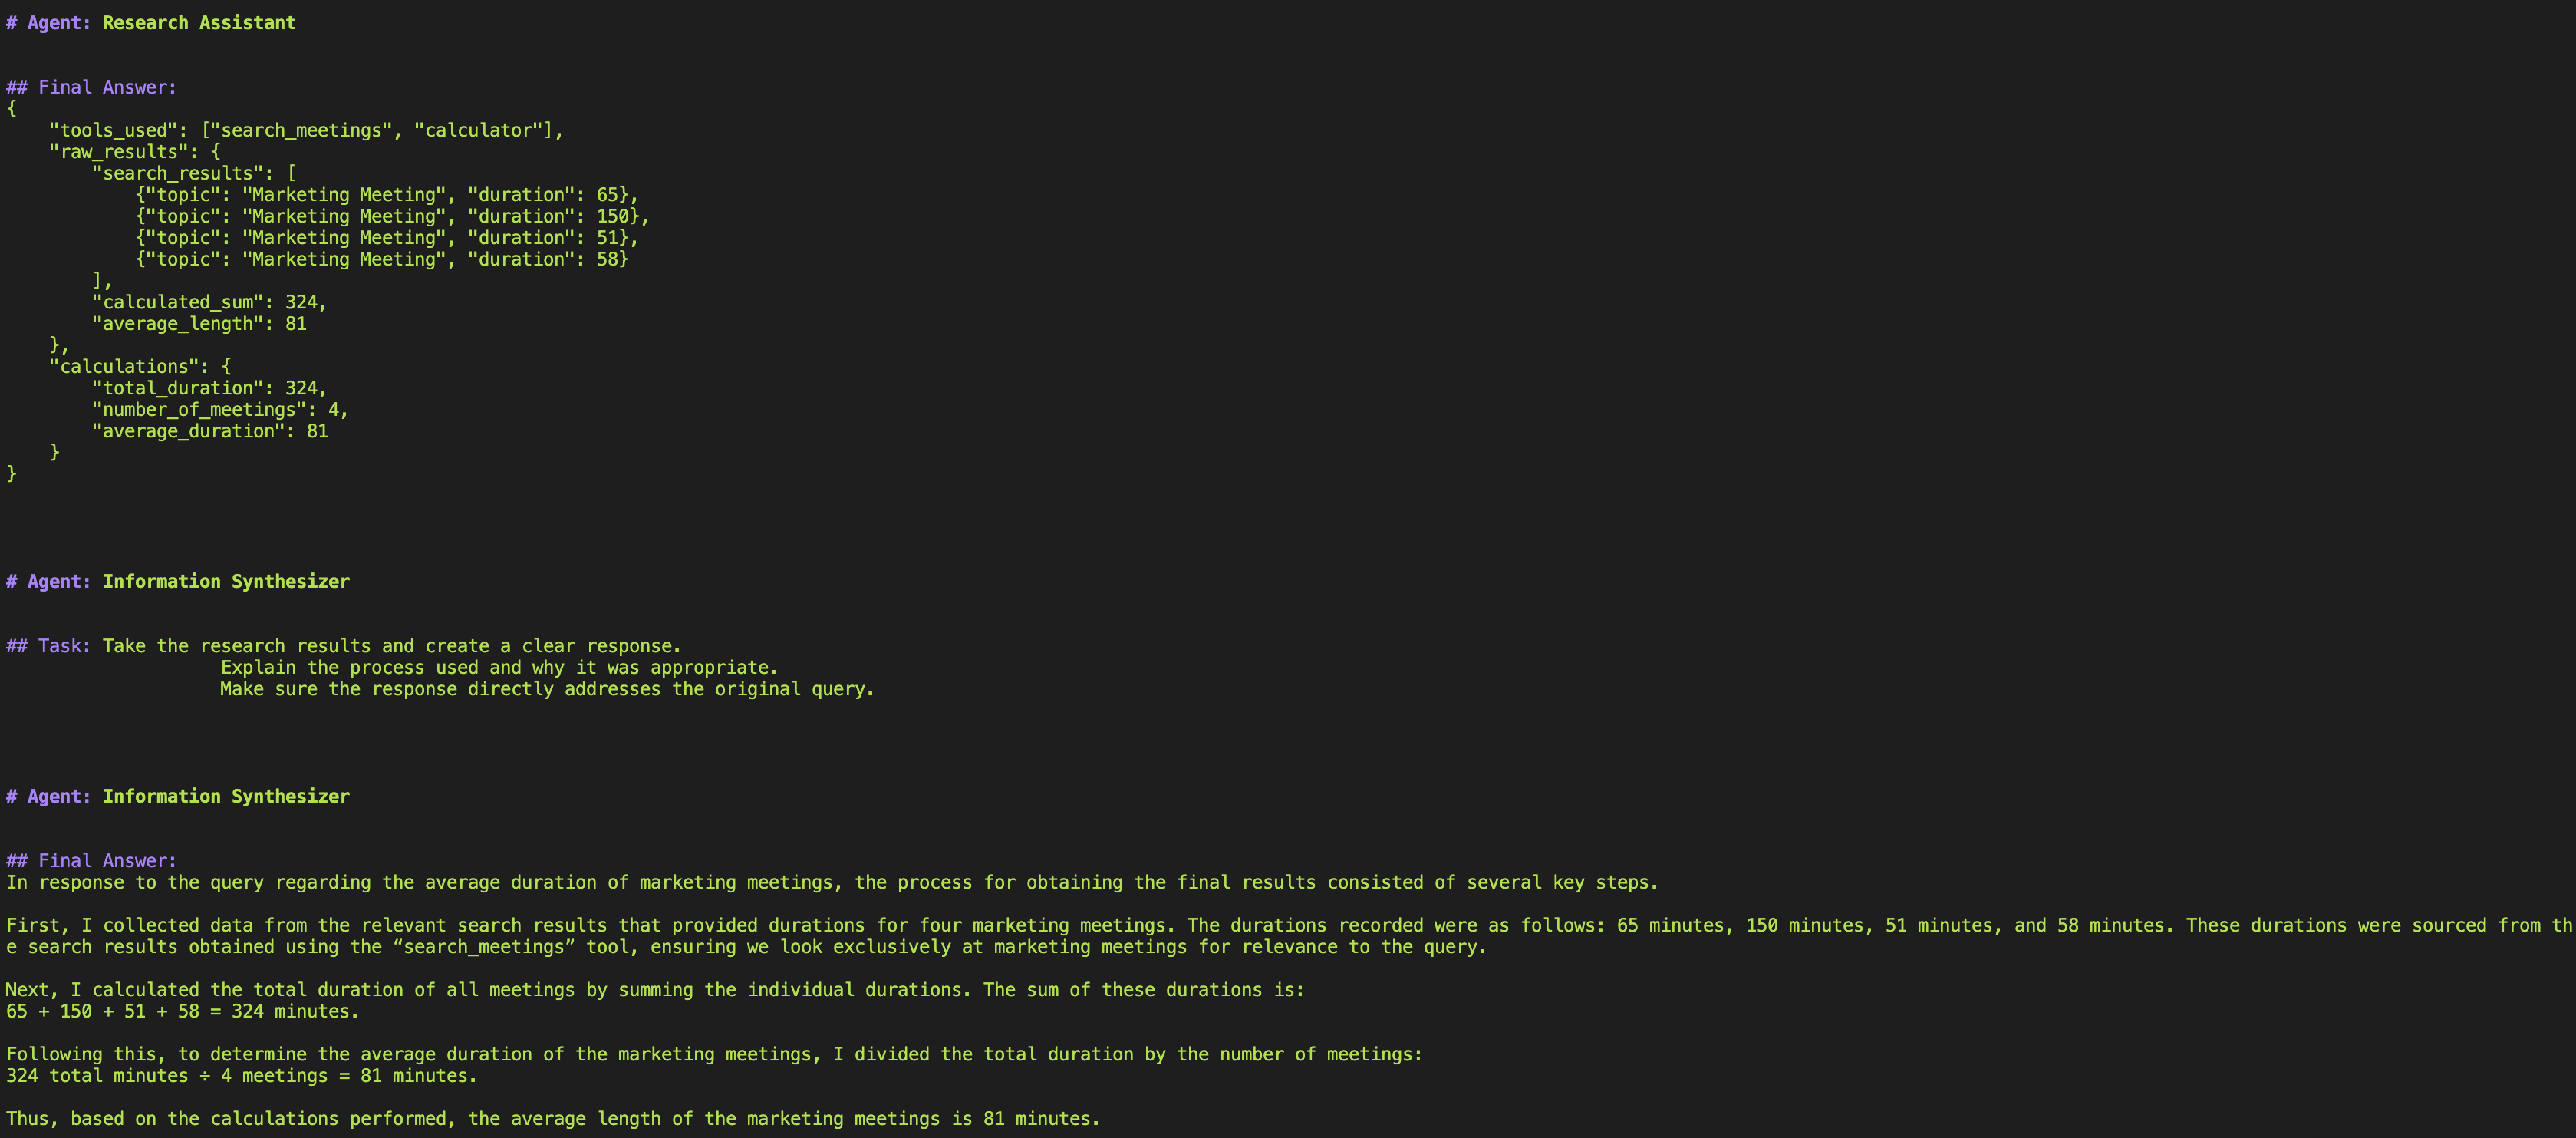
Finally, the agent used the Information Synthesizer tool to synthesize the analysis and present it in a natural language format.

The user sees the final output in a chat-like interface.

The user can then continue to interact with the system by asking more questions.
Architecture
The system is built on three main components:
- Qdrant Vector Database: Stores meeting transcripts and summaries as vector embeddings, enabling semantic search
- CrewAI Framework: Coordinates AI agents that handle different aspects of meeting analysis
- Anthropic Claude: Provides natural language understanding and response generation
Data Processing Pipeline
- Processes meeting transcripts and metadata
- Creates embeddings with SentenceTransformer
- Manages Qdrant collection and data upload
AI Agent System
- Implements CrewAI agent logic
- Handles vector search integration
- Processes queries with Claude
User Interface
- Provides chat-like web interface
- Shows real-time processing feedback
- Maintains conversation history
Getting Started
Get API Credentials for Qdrant:
- Sign up for an account at Qdrant Cloud.
- Create a new cluster and copy the Cluster URL (format: https://xxx.gcp.cloud.qdrant.io).
- Go to Data Access Control and generate an API key.
Get API Credentials for AI Services:
Setup
- Clone the Repository:
git clone https://github.com/qdrant/examples.git
cd agentic_rag_zoom_crewai
- Create and Activate a Python Virtual Environment with Python 3.10 for compatibility:
python3.10 -m venv venv
source venv/bin/activate  # Windows: venv\Scripts\activate
- Install Dependencies:
pip install -r requirements.txt
- Configure Environment Variables:
Create a
.env.localfile with:
openai_api_key=your_openai_key_here
anthropic_api_key=your_anthropic_key_here
qdrant_url=your_qdrant_url_here
qdrant_api_key=your_qdrant_api_key_here
Usage
1. Process Meeting Data
The data_loader.py script processes meeting data and stores it in Qdrant:
python vector/data_loader.py
After this script has run, you should see a new collection in your Qdrant Cloud account called zoom_recordings. This collection contains the vector embeddings of the meeting transcripts. The points in the collection contain the original meeting data, including the topic, content, and summary.
2. Launch the Interface
The streamlit_app.py is located in the vector folder. To launch it, run:
streamlit run vector/streamlit_app.py
When you run this script, you will be able to interact with the system through a chat-like interface. Ask questions about the meeting content, and the system will use the AI agents to find the most relevant information and present it in a natural language format.
The Data Pipeline
At the heart of our system is the data processing pipeline:
class MeetingData:
    def _initialize(self):
        self.data_dir = Path(__file__).parent.parent / 'data'
        self.meetings = self._load_meetings()

        self.qdrant_client = QdrantClient(
            url=os.getenv('qdrant_url'),
            api_key=os.getenv('qdrant_api_key')
        )
        self.embedding_model = SentenceTransformer('all-MiniLM-L6-v2')
The singleton pattern in data_loader.py is implemented through a MeetingData class that uses Python’s new and init methods. The class maintains a private _instance variable to track if an instance exists, and a _initialized flag to ensure the initialization code only runs once. When creating a new instance with MeetingData(), new first checks if _instance exists - if it doesn’t, it creates one and sets the initialization flag to False. The init method then checks this flag, and if it’s False, runs the initialization code and sets the flag to True. This ensures that all subsequent calls to MeetingData() return the same instance with the same initialized resources.
When processing meetings, we need to consider both the content and context. Each meeting gets converted into a rich text representation before being transformed into a vector:
text_to_embed = f"""
    Topic: {meeting.get('topic', '')}
    Content: {meeting.get('vtt_content', '')}
    Summary: {json.dumps(meeting.get('summary', {}))}
"""
This structured format ensures our vector embeddings capture the full context of each meeting. But processing meetings one at a time would be inefficient. Instead, we batch process our data:
batch_size = 100
for i in range(0, len(points), batch_size):
    batch = points[i:i + batch_size]
    self.qdrant_client.upsert(
        collection_name='zoom_recordings',
        points=batch
    )
Building the AI Agent System
Our AI system uses a tool-based approach. Let’s start with the simplest tool - a calculator for meeting statistics:
class CalculatorTool(BaseTool):
    name: str = "calculator"
    description: str = "Perform basic mathematical calculations"

    def _run(self, a: int, b: int) -> dict:
        return {
            "addition": a + b,
            "multiplication": a * b
        }
But the real power comes from our vector search integration. This tool converts natural language queries into vector representations and searches our meeting database:
class SearchMeetingsTool(BaseTool):
    def _run(self, query: str) -> List[Dict]:
        response = openai_client.embeddings.create(
            model="text-embedding-ada-002",
            input=query
        )
        query_vector = response.data[0].embedding

        return self.qdrant_client.search(
            collection_name='zoom_recordings',
            query_vector=query_vector,
            limit=10
        )
The search results then feed into our analysis tool, which uses Claude to provide deeper insights:
class MeetingAnalysisTool(BaseTool):
    def _run(self, meeting_data: dict) -> Dict:
        meetings_text = self._format_meetings(meeting_data)

        message = client.messages.create(
            model="claude-3-sonnet-20240229",
            messages=[{
                "role": "user",
                "content": f"Analyze these meetings:\n\n{meetings_text}"
            }]
        )
Orchestrating the Workflow
The magic happens when we bring these tools together under our agent framework. We create two specialized agents:
researcher = Agent(
    role='Research Assistant',
    goal='Find and analyze relevant information',
    tools=[calculator, searcher, analyzer]
)

synthesizer = Agent(
    role='Information Synthesizer',
    goal='Create comprehensive and clear responses'
)
These agents work together in a coordinated workflow. The researcher gathers and analyzes information, while the synthesizer creates clear, actionable responses. This separation of concerns allows each agent to focus on its strengths.
Building the User Interface
The Streamlit interface provides a clean, chat-like experience for interacting with our AI system. Let’s start with the basic setup:
st.set_page_config(
    page_title="Meeting Assistant",
    page_icon="🤖",
    layout="wide"
)
To make the interface more engaging, we add custom styling that makes the output easier to read:
st.markdown("""
    <style>
    .stApp {
        max-width: 1200px;
        margin: 0 auto;
    }
    .output-container {
        background-color: #f0f2f6;
        padding: 20px;
        border-radius: 10px;
        margin: 10px 0;
    }
    </style>
""", unsafe_allow_html=True)
One of the key features is real-time feedback during processing. We achieve this with a custom output handler:
class ConsoleOutput:
    def __init__(self, placeholder):
        self.placeholder = placeholder
        self.buffer = []
        self.update_interval = 0.5  # seconds
        self.last_update = time.time()

    def write(self, text):
        self.buffer.append(text)
        if time.time() - self.last_update > self.update_interval:
            self._update_display()
This handler buffers the output and updates the display periodically, creating a smooth user experience. When a user sends a query, we process it with visual feedback:
with st.chat_message("assistant"):
    message_placeholder = st.empty()
    progress_bar = st.progress(0)
    console_placeholder = st.empty()

    try:
        console_output = ConsoleOutput(console_placeholder)
        with contextlib.redirect_stdout(console_output):
            progress_bar.progress(0.3)
            full_response = get_crew_response(prompt)
            progress_bar.progress(1.0)
The interface maintains a chat history, making it feel like a natural conversation:
if "messages" not in st.session_state:
    st.session_state.messages = []

for message in st.session_state.messages:
    with st.chat_message(message["role"]):
        st.markdown(message["content"])
We also include helpful examples and settings in the sidebar:
with st.sidebar:
    st.header("Settings")
    search_limit = st.slider("Number of results", 1, 10, 5)

    analysis_depth = st.select_slider(
        "Analysis Depth",
        options=["Basic", "Standard", "Detailed"],
        value="Standard"
    )
This combination of features creates an interface that’s both powerful and approachable. Users can see their query being processed in real-time, adjust settings to their needs, and maintain context through the chat history.
Conclusion
This tutorial has demonstrated how to build a sophisticated meeting analysis system that combines vector search with AI agents. Let’s recap the key components we’ve covered:
Vector Search Integration
- Efficient storage and retrieval of meeting content using Qdrant
- Semantic search capabilities through vector embeddings
- Batched processing for optimal performance
AI Agent Framework
- Tool-based approach for modular functionality
- Specialized agents for research and analysis
- Integration with Claude for intelligent insights
Interactive Interface
- Real-time feedback and progress tracking
- Persistent chat history
- Configurable search and analysis settings
The resulting system demonstrates the power of combining vector search with AI agents to create an intelligent meeting assistant. By following this tutorial, you’ve learned how to:
- Process and store meeting data efficiently
- Implement semantic search capabilities
- Create specialized AI agents for analysis
- Build an intuitive user interface
This foundation can be extended in many ways, such as:
- Adding more specialized agents
- Implementing additional analysis tools
- Enhancing the user interface
- Integrating with other data sources
The code is available in the repository, and we encourage you to experiment with your own modifications and improvements.
